Looking for a specific recipe? Search here:

Friday, December 28, 2012

Homemade Hot Cocoa Mix


I love all things chocolate and a cup of steaming hot chocolate is no exception.

Ready made mixes available in supermarkets always leave me searching for something better since they seldom deliver what the label promises.  I’ve been looking for a good homemade cocoa mix for a while now and have finally come across a recipe that satisfies my craving for liquid chocolate.

The use of good quality cocoa is essential but this recipe adds chocolate pieces for an extra element of creaminess and deep chocolate taste.

Although skim milk powder is an ingredient in the mix and the addition of hot water brings this drink to life, using milk certainly takes it up a notch.

This recipe makes a good amount to last through the cold winter months.  On the other hand if you are feeling generous it makes more than enough to share with others who have an affinity for a good, rich cup of hot chocolate.


Homemade Hot Cocoa Mix


3 cups non fat dry milk powder
2 cups powdered sugar
1 1/2 cups cocoa powder
1 1/2  cups semisweet chocolate chips or chopped chocolate.
¼ teaspoon salt
  1. Wisk together all ingredients in a large bowl.
  2. Working in two batches pulse the ingredients in a food processor until chocolate is finely ground.
  3. Store in an airtight container for up to 3 months.
  4. Makes about 20 servings.

To Make Hot Cocoa

Place 1/3 cup or (4 level tablespoons) of mix into a mug and stir in 1 cup hot water or milk.  Top with whipped cream or miniature marshmallows.

Notes Tips and Suggestions

  • Use water or milk that is very hot in order for chocolate pieces to melt and make sure to stir well.
  • This mix is not too sweet.
  • Substitute white chocolate chips or chopped chocolate for semi sweet chocolate.
  • A pinch of cinnamon or cayenne pepper enhances the taste of hot chocolate.

Friday, December 21, 2012

Cookie Crumb Truffles


In my house this recipe is known as the “other” truffles. The recipe previously posted for Chocolate Truffles although chocolaty and delicious comes with a few challenges. This kind is best made when home alone and very focused on what you are doing. 

Cookie Crumb Truffles are a little more fun to make and actually even more fun if made together with someone else.  It's very important to decorate immediately after shaping into balls while they are still moist for the decorations to stick well. This is where an extra pair of clean hands are appreciated to keep the decorations on the truffles and not on sticky, chocolate covered hands.

It has become somewhat of a tradition for my daughter and me to make these truffles together every year. We began making them during her younger years therefore she was given the job of coating them with sprinkles and other decorations while I took on the messier job of forming the truffles into small balls. 

Not much has changed through the years as I am still the one with the sticky chocolaty hands and she is still the decorator.

It’s also in the decorator’s job description to carefully inspect the truffles making sure the size and appearance is just right, a quality control of sorts. When any misshaped or less than beautifully decorated truffle is detected it's instantly taste tested by the decorator.

I suppose this is one of the perks of such a high demanding job although the one with the sticky chocolaty hands has the all important job of taking the final count!

Truffles

½ cup whipping cream (35%)
1 cup semi sweet or milk chocolate chips
1 cup graham wafer crumbs
½ cup finely chopped peanuts, walnuts or pecans
Chocolate sprinkles, coconut, chopped nuts, cocoa etc.
  1. Bring cream to a boil.
  2. Remove from heat and stir chocolate chips, blend until smooth.
  3. Stir in remaining ingredients.
  4. Chill until mixture is firm enough to roll (1 to two hours).
  5. Roll into balls then finish off with decorations.
  6. Refrigerate, makes about 36 truffles.


Notes, Tips and Suggestions

  • Placing the sprinkles into small baggies makes coating the truffles easier with less mess.  This is especially helpful when making them with younger children so you won’t be sweeping up sprinkles for the next two weeks. This effective method was devised by the decorator a few years back and I am the thankful cleanup crew!  
  • Use Oreo or chocolate cookie crumbs instead of graham crumbs for a darker, tasty version of this truffle.
  • Milk chocolate chips can be substituted for the semi sweet chips.
  • Give equal parts semi sweet chocolate chips and almonds a rough chop in a food processor for an interesting truffle coating.
  • Place truffles in small paper liners for special presentation.

Friday, December 14, 2012

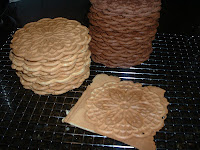
Classic Pizzelle


It's definitely time to give the oven a rest after two solid weeks of cookie baking. But it isn't over yet…for cookie making that is.

Pizzelle are traditional Italian waffle cookies originating from the Abruzzo region of South Central Italy.  The batter usually consists of flour, butter, sugar, eggs and various flavourings and baked in a Pizzelle iron.  The patterns on both sides of the iron resemble snowflakes and the first Pizzelle irons were hand held over a  hot stove top burner flipping it over as each side cooked.

I am very happy to say the invention of the electrical version has made things a little easier.

I’ve owned my pizzelle iron for many years but unfortunately a couple of years ago it unexpectedly stopped working.  Thanks to my in house appliance doctor and some minor surgery it was restored back to working condition.

Sensing that its days were numbered I invested in a new one and unfortunately I was right.  My old one has been admitted for repeat surgery and I'm anticipating a favourable prognosis since my new iron just doesn’t measure up.

Pizzelle are light, flavourful, crisp cookies.  They can be eaten just as they are or formed into a bowl for serving ice cream or fruit.  Wrapping them around a wooden dowel while still warm makes  great cannoli shells ready to be filled with a favourite filling.  I always add a little extra batter than called for which spills over the actual Pizzelle shape allowing me to cut off the excess resulting in uniform and very neat looking cookies.

On a previous post for Amaretti Cookies I suggested that some words are best left untranslated.  The translation for Pizzelle is literally “round and flat” or "little pizzas".

Need I say more?

Classic Pizzelle
3 eggs
1¾ cups flour
¾ cups sugar
1 tablespoon vanilla or anise flavouring
½ cup butter or margarine (melted and cooled)
2 teaspoons baking powder
  1. Beat eggs with mixer until frothy then gradually add sugar.
  2. Add cooled butter/margarine and flavouring and continue beating until smooth.
  3. Sift together flour and baking powder and add to egg mixture beating until well mixed. (Dough will be thick and sticky.)
  4. Bake in preheated Pizzelle Iron.
  5. Makes approximately 25 to 30 Pizzelle.
Chocolate Pizzelle
  1. Add ¼ cup cocoa, ¼ cup sugar and ¼ teaspoon baking powder to dry ingredients for Classic Pizzelle.
  2. Blend into egg mixture until smooth.
  3. Makes approximately 25 to 30 Pizzelle.

Notes, Tips and Suggestions

  • Blend ½ cup finely chopped walnuts or pecans into batter for a variation.
  • If extra batter is used for full size Pizzelle make sure excess is trimmed while cookie is still warm for best results.
  • If extra batter is used to get a good shaped Pizzelle  the yield will be a few less than the amount stated above. The pieces trimmed off need not go to waste, they are a special treat for the baker.


To make a Pizzelle Bowl press warm Pizzelle between two  same size bowls for a few seconds then trim off excess cookie.


Friday, December 7, 2012

Mocha Cherry Snowballs


The pile of cookie recipes on the kitchen counter is dwindling and it looks like I might be finished baking sometime early next week. Different shapes, textures, flavours and sizes make an interesting assortment on a tray and two batches of each variety is usually enough to enjoy with plenty to give away.

These cookies are surely kin to the Mexican Wedding Cookies  for which I have previously posted a recipe.  Again, no apparent Mexican spices can be found in them and I’m not sure why someone saw fit to call them Mexican Mocha Balls unless Mexican Chocolate was called for in the original recipe.

I usually make them each year not only because they are delicious and quite easy to make but their  texture and taste is a little different from the rest of the cookies.

This year while rolling these cookies in granulated sugar for finishing touches they reminded me of little chocolate snowballs. I began thinking of possible new names and finally decided to rename them Mocha Cherry Snowballs.

This recipe was not in the plan to post therefore steps of preparation pictures are not available but rest assured that they are a very simple cookie to make not requiring much explanation.

No matter what these cookies are called it doesn’t change the fact that they make a tasty addition to any cookie assortment whether they be Mexican or not!

Mocha Cherry Snowballs (a.k.a. Mexican Mocha Balls)


1 cup butter or margarine (hard margarine) at room temperature
½ cup granulated sugar
1 teaspoon vanilla
2 cups flour
¼ cup unsweetened cocoa
1 teaspoon instant coffee granules
¼ teaspoon salt
1 cup finely chopped nuts (walnuts, pecans, peanuts etc.)
1/3 cup drained and chopped maraschino cherries
granulated sugar to roll them in after baking
  1. With mixer beat together margarine/butter vanilla and sugar.
  2. In a separate bowl sift together flour, cocoa, instant coffee and salt.
  3. Stir dry ingredients into wet ingredients.
  4. Stir in nuts and maraschino cherries.
  5. Form into 1 inch balls and place on an ungreased cookie sheet. 
  6. Bake in a preheated 325 degrees F oven. for 20 minutes.
  7. While still warm, roll in granulated sugar.
  8. Cool completely on rack.

Notes, Tips and Suggestions
  • Blend the nuts and maraschino cherries by hand, it’s much easier.
  • If the dough seems a little dry just keep working it with your hands until it comes together.
  • Use a good quality cocoa, it makes all the difference. 
  • These cookies freeze well.

Friday, November 30, 2012

Amaretti


A stack of cookie books along with loose recipe cards which have been pulled out of recipe binders sit on the kitchen counter reminding me that I should get started with my holiday baking.

For the next few weeks the kitchen will become a cookie factory by day but by dinner time not a trace of the day's work will remain and the room will once again return to it's normal routine.  Flour and sugar containers will empty out as fast as they are filled and the fragrance of melting chocolate will fill the house for days.

The search for every empty container begins and trays that will hold an assortment of cookies for giving away to family, friends and neighbours will be placed close by ready to be filled.

Some cookies are just standard for this time of year and expected to appear among the assortment  but now and then a new recipe is added and time will tell if it becomes a traditional favourite.

Amaretti is the Italian name for macaroon.  Crisp and crunchy on the outside and soft and chewy on the inside these cookies have adorned many cookie trays at Italian weddings and any other occasion worth celebrating.

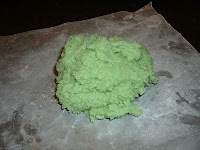
Almonds, glace or crystallized cherries and chocolate are among some of the more familiar decorations that top these cookies and the dough is sometimes tinted in various colours I suppose just to make things a little more interesting.

I’ve tried a few recipes for Amaretti over the years but was unsuccessful in replicating that chewy almond center like those sold in Italian bakeries. Several years ago I came across a recipe for these cookies in a magazine which called for almond paste as the main ingredient.  The recipe sat in my “to try out file” for a very long time as I had no clue where to buy almond paste.

On a trip to the U.S. to visit relatives a few years back I had my first encounter with a seven pound tin of pure almond paste and have now made a point of purchasing another tin each time we visit.

The awaiting Amaretti recipe finally met with the almond paste and the rest is history.  I’ve been making these cookies for many years since then and consider them to be as good if not better than store bought.

Translated, the word Amaretti means “little bitter things” hardly words that would strike a craving for them. I believe that bitter almonds were part of the original Amaretti recipe thus giving them this less than appealing name.  I'm sure there’s a small amount of bitter almonds in the paste that I buy which accounts for the intense almond flavour in the cookie. 

These delightfully delicious, sweet cookies are anything but bitter and I believe some words are better left untranslated! 

Amaretti
½ cup granulated sugar
½ cup confectioners sugar
¼ cup unsifted flour
Pinch of salt
8 ounces almond paste
2 egg whites
  1. Grease and flour cookie sheets or line with parchment paper
  2. Sift together flour, both sugars and salt.
  3. Break almond paste into small pieces in a separate bowl.
  4. Add the egg whites and beat with an electric mixer until smooth.
  5. Stir in dry ingredients with wooden spoon or spatula.
  6. Tint part of the dough with a few drops green food colouring (optional.)
  7. Pipe onto prepared sheets and bake in a preheated 325 degree F. oven for 20 to 25 minutes.
  8. Remove onto wire rack to cool.
  9. Makes 20 to 25 cookies.


Notes, Tips and Suggestions
  • Do not use marzipan in this recipe as it contains a greater ratio of sugar than almond paste and will not give good results. (believe me, I've tried it)
  • Dough can also be formed into small balls and rolled in coarsely chopped almonds before baking.
  • Place cherries or almonds on cookies before baking but if decorating with chocolate it must be melted and added after the cookies are baked and cooled.
  • These cookies freeze very well. 

Friday, November 23, 2012

Brownies in a Jar


I’ve always been intrigued by in a jar recipes. Over the past years a few cook books on the subject have been added to my recipe collection.

These books include recipes for cookies, muffins, breads and scones and even soups and chilies.  The ingredients are attractively layered in one quart mason jars with added instructions for baking or cooking.

I’ve put together cookie recipes in a jar for a few different occasions but this is my first try at a recipe for brownies.

Two different recipes that I came across seemed to have good potential for success but needed to be tested before posting.  Although both recipes had similar ingredients the second one gave much better results and used less sugar and a lesser amount of butter than oil called for in the first recipe.

I promise to only share recipes that I have first tried making myself and feel confident about the results.  This recipe makes delicious, chewy, moist brownies that can be prepared in a few minutes by adding butter, eggs and vanilla to the ingredients in the jar.

They are quite easy and inexpensive to put together and a few decorative touches to the jar allows them to be given away with pride. For those who receive them, the recipe is simple enough to be made by the most novice baker and enjoyable for all chocolate brownie lovers!

I must confess that I didn’t have a favourite recipe for brownies in my collection and not for lack of trying to find one.  In the jar or not this recipe makes great brownies.

No more brownies from a box!


Brownies in a Jar

1 ½ cups granulated sugar
1/3 cup cocoa
1 cup peanut butter chips or white chocolate chips
1 cup all purpose flour
½ teaspoon baking powder
¼ teaspoon salt
½ cup mini chocolate chips (see notes, tips and suggestions)

  1. On a piece of wax paper mix together flour, baking powder and salt.
  2. Layer the ingredients in a one quart mason or glass jar in the following order from bottom to top; sugar, cocoa, peanut butter chips, flour mixture and chocolate chips.
  3. Tap jar gently on the counter to settle each layer before adding the next one.
  4. Cover, decorate and attach baking directions to jar.

Baking Directions
  1. Heat oven to 350 degrees F.
  2. Grease and flour an 8x8 inch baking pan.
  3. Combine ½ cup melted and cooled butter and 2 slightly beaten eggs in a large bowl.
  4. Gently stir in jar contents.
  5. Spread in prepared pan and bake for 35 minutes.
  6. Cool in pan, cut into bars.
  7. Makes 16.

Notes, Tips and Suggestions

Use a good quality cocoa powder.  I discovered very good cocoa in the Bulk Barn called Ruddy Red and have stopped buying anything else. It's a little more expensive but worth every cent.

The Finishing Touches


  • To cover jar lid cut a round piece of your favourite material in a 6 1/2 inch diameter.
  • First use an elastic band to secure and adjust the circle of material over the lid.
  • Decorate with appropriate decorations such as ribbons and bells etc.
  • The use of a canning funnel makes the job of filling the jar a little cleaner.
  • Instead of tapping the jars on the counter to settle ingredients I used a wooden tamper to gently pat the layers down.
  • After adding the cocoa, since it's a small amount, use a spoon to push it towards the sides of the jar as much as you can so that the layer looks thicker otherwise you won't be able to see the cocoa layer as much then add the peanut butter or white chips.
  • The recipe calls for mini chocolate chips for the top layer, I used the regular size since that is what I had at the time and it filled the jar to the top.  Using the mini ones may leave some unfilled space. The mini chips settle a little more with less space in between them than the regular size chips.
  • I found there was no room to punch a hole in the printable tag and used 2 adhesive hole reinforcements on the corner of the tag for putting the ribbon through (sticky sides together).
  • Printable tag can be glued to the back side of the jar instead.
  • The printable tags are available  here.


Friday, November 16, 2012

Chocolate Confetti


My intention was to cook and post a savoury dish recipe that I was making for dinner this week but upon opening my pantry to gather the needed ingredients a bag of mini coloured marshmallows caught my eye.

The day was dull and grey and definitely needed some colour so I changed my mind and decided to make this special, colourful treat that my kids enjoyed so many times while growing up.

These fun treats put a smile on the face and sparkle in the eye of both children and adults alike.  I know this because one of my adult children occasionally reminds me of this recipe.

Before the peanut butter ban in the schools these sweets made it into their lunches on occasion.  I remember my daughter once sharing this snack with a very lonely foreign student far away from home and family.  Her friend was so grateful for something homemade that we decided to once again brighten her day and make some especially for her which she greatly appreciated.

I eventually got around to making dinner and intend to post the savoury recipe at some point unless once again distracted by something else in the pantry.

I can’t wait to see the smiles these sweet morsels will bring to the faces of some very special children we will be visiting this weekend but a portion have been lovingly put aside for the big children in my life as well.

Chocolate Confetti
¼ cup butter or margarine
½ cup peanut butter
1 cup semisweet chocolate chips
1 bag (250 gr.) miniature coloured marshmallows
coconut for topping
  1. Melt butter and peanut butter together in a large saucepan.
  2. Stir in chocolate chips until melted.
  3. Cool mixture so that you can hold your hand on the bottom of the pan.
  4. Add marshmallows and stir until all are coated.
  5. Line a 9x9 inch pan that has been lined with wax paper for easy removal.
  6. Pack mixture into pan making sure it is evenly distributed.
  7. Sprinkle coconut on top.
  8. Refrigerate until hardened then remove from pan and cut into squares.
  9. Makes 24 to 36 pieces depending on size.


Notes, Tips and Suggestions
  • Placing pan directly into the freezer for a couple of hours before slicing makes cutting the squares much easier and neater, after cutting store in refrigerator.
  • Add about a quarter cup of chopped nuts into the mix for something a little different .

Friday, November 9, 2012

Banana Walnut Biscotti


I always seem be on the lookout for a new Biscotti recipe and recently tried a recipe for Dark Chocolate Ginger Biscotti which have now become the favourite of a certain ginger lover that I know.

These Biscotti are studded with pieces of candied ginger and have a deep chocolate flavour that would certainly satisfy any chocolate lover.

Not being too fond of ginger myself I went searching for another new recipe to try out and came across this Banana Bread Biscotti recipe.  It looked quite promising and I was happy to see very ripe banana as an ingredient which piqued my interest.

One can never have too many ripe banana recipes and although they usually end up in Banana Bread or Banana Muffins I occasionally find myself with one very lonely very ripe banana which isn’t enough for either recipe.

I had a few reservations about this recipe but felt compelled to try it out nevertheless.  After making the first batch and following the recipe exactly I decided to make a few small changes and give it another try.

This is not to say that the first batch hasn’t almost disappeared from the cookie jar. By substituting the one tablespoon of oil called for in the recipe with two tablespoons of soft butter the Biscotti have a little more richness that I found lacking in the original recipe.

The next time I make these I will sneak in a third tablespoon of butter.

I also found the temperature for the second baking of the sliced Biscotti a little low at 275 degrees F. which didn’t allow those lovely golden edges to develop, I therefore left the oven temperature the same for the second baking and had better results.

Having already made at least two changes in the recipe it was easy to take the liberty of making a third.  The name Banana Bread Biscotti gives the idea that they are soft and moist like any banana bread.  On the contrary, they are crisp, crunchy, not too sweet little slices of deliciousness just waiting to be dunked into a hot cup of cafĂ© latte!

I have renamed the recipe Banana Walnut Biscotti and added it to my ever growing Biscotti recipe file.

Banana Walnut Biscotti


Preheat oven to 350 degrees F.
1 3/4 cups all purpose flour
1/2 cup sugar
1 teaspoon baking powder
1/4 teaspoon salt
1/2 cup mashed banana (1 banana)
1 tablespoon canola oil (or 2 to 3 tablespoons soft butter)
1 large egg
1 teaspoon vanilla
1/2 cup chopped walnuts
  1. In a medium bowl, stir together flour, baking powder and salt; set aside.
  2. In a large bowl, combine banana, oil, egg, sugar and vanilla and mix until well blended.
  3. Add the flour mixture and walnuts to the banana mixture and stir just until combined.
  4. Divide the mixture in half and shape each half into an 10 inch log.
  5. Place the logs about 4 inches apart on a cookie sheet that has been greased or lined with parchment. Press the logs into two rectangles about 3 inches across.
  6. Bake for 30-35 minutes, until firm and cracked on top. Transfer the logs to a wire rack to cool for 5 minutes.
  7. Place logs on a cutting board, trim the ends and using a sharp, serrated knife, cut each diagonally into 1/2 to 3/4 inch thick slices. Place biscotti cut side down on the cookie sheet. Return them to the oven (still at 350 degrees F.) and bake for 10 to 15 minutes. Flip them over and bake for another 10 to 15 minutes. Transfer to a wire rack to cool.
  8. Makes 2 dozen.


Notes, Tips and Suggestions
  • Walnuts can be replaced with an equal amount of chocolate chips in which case changes the name of the recipe again.  
  • Make sure to flatten the logs of dough as directed in the recipe since these biscotti do not spread much while baking.
  • Dipping one end of the biscotti into melted chocolate takes them to another level.