Looking for a specific recipe? Search here:

Wednesday, December 28, 2011

Mexican Wedding Cookies


I don't know why these cookies are called Mexican Wedding Cookies since the ingredients do not include traditional Mexican spices or flavours.
Could the name suggest that they are traditionally made in Mexico to celebrate weddings?
I just couldn't resist doing a little research on this yummy little treat and found that many countries have their own versions of this cookie.
You may have come across similar cookie recipes under such names as Kohlichky, Sand Tarts, Kourabi and Russian Tea Cakes to mention a few.
Food historians have traced them far back to Medieval Arab cuisine. They were imported by the Moors to Spain, diffused throughout Europe then introduced to the New World by 16th century explorers.
It would seem that each time the recipe entered a new country it was adopted under a new name and at some point took on the name of Mexican Wedding Cookies or Cakes.
Unfortunately this still doesn't explain why they are called Mexican Wedding Cookies. I will have to return to my initial assumption that they were delicious enough to be served at Mexican Weddings.
I'm sure this history lesson will inspire you to bake a batch, after all they have traveled such a long way.
If not, take my word. They are light and delicious, require simple ingredients, and are quite easy to make.
The best part is that you can easily loose count and eat quite a few before realizing how many you have actually eaten!

Mexican Wedding Cookies

1 cup butter (softened)
2 cups flour
3 tablespoons confectioner's sugar
1 cup finely chopped walnuts
1/4 teaspoon almond extract
1 teaspoon vanilla
pinch of salt
sifted icing sugar (to roll the cookies in)
  1. Cream together butter and extracts until well blended.
  2. Sift together flour, sugar and salt, stir into butter mixture.
  3. Add chopped nuts and blend well.
  4. Shape into small balls or crescents.
  5. Place on ungreased or parchment lined baking sheets.
  6. Bake at 400 degrees F. for 10 to 15 minutes or until set and lightly browned.(do not over bake)
  7. While still warm roll in sifted icing sugar several times until well coated.
  8. Cool completely before storing.
  9. Makes 25 to 30 cookies.


Notes, Tips and Suggestions
  • Pecans can be used instead of walnuts.
  • Although these can be shaped into balls, crescents add a different shape to a mixed cookie tray.
  • Before serving, sift a little more sugar over tops of cookies just to even out the coating and improve the presentation.
  • These freeze very well.
  • Mexican Wedding Cookies have made their way into many holiday cookie trays and a few Italian weddings as well.

Monday, December 19, 2011

Thumbprint Cookies


I've come across recipes for thumbprint cookies in various cookbooks but never inspired to bake a batch.
A while back a local pastry shop was selling them for the amount of three dollars a piece and even though they were a bit larger than the usual it made me wonder what ingredients might be in them to warrant such a high price.
I recalled seeing a recipe for Thumbprint Cookies in an old Betty Crocker cookbook and decided it was time I give them a try.
This was the first of many cookie books in my collection. The worn out pages are doing their best to cling to the ever strong spiral binding.
When my children were young they would occasionally sit at the kitchen table and leaf through the pages as if it was a picture book. Many little fingerprints remain where they pointed out the next cookie they wanted to see emerge from the oven.
A little research revealed that there are many variations of this recipe and their origin is somewhat of a mystery.
However, credit is given to the Polish or Jewish people of Eastern Europe and they can also be known as Polish Tea Cakes, Butterballs and Bird's Nest Cookies.
The ingredients are basic and preparation simple enough for kids to get their hands into and make.
The recipe in my cookie book appealed to me more than other recipes since brown sugar is used instead of granulated along with a combination of shortening and butter.
They have a wonderful shortbread taste which can only be enhanced by the quality of filling that is placed in the center.
I understand why people could be persuaded to pay such a price but personally speaking, the ease in which they can be made and inexpensive ingredients required would keep me from taking a trip to the bake shop.
Not caring much for using my thumb to make the dent in the center of the cookie I decided to use a thimble instead.
I soon discovered that I wasn't the first to come up with this idea. Recently, I came across an almost identical recipe and you guessed it...Thimble Cookies.

Thumbprint Cookies

1/4 cup shortening
1/4 cup butter or margarine
1/4 cup brown sugar (firmly packed)
1 egg, separated
1/2 teaspoon vanilla
1 cup all-purpose flour
1/4 teaspoon salt
3/4 cup finely chopped walnuts
jelly or jam
  1. Preheat oven to 350 degrees F.
  2. Beat sugar, shortening, butter, egg yolk and vanilla thoroughly.
  3. Sift together flour and salt then stir into butter mixture.
  4. Roll dough into balls (around one inch size)
  5. Beat egg white slightly with a fork.
  6. Dip balls into egg white then roll in nuts.
  7. Place about 1 inch apart on ungreased baking sheet.
  8. Make a dent in the center of each ball of dough.
  9. Bake 10 to 12 minutes or until set.
  10. Cool, then fill with favourite jelly or jam.
  11. Makes about 30 cookies depending on size of balls.


Notes, Tips and Suggestions
  • After baking, dents will rise making less room for the filling. While the cookies are still on the baking sheet and hot, use thimble (or thumb if you wish to remain true to the name of the cookie) to reform the dent.
  • A small scoop comes in handy to measure out equal amounts of dough.
  • As always, a pastry bag and plain round tip makes the best filling tool.
  • Dents can also be made using the bottom of a round shaped 1/2 teaspoon measuring spoon.
  • Cookies can be filled with melted chocolate as well.
  • Finely chopped pecans or almonds can also be used to roll the cookies in.
  • Store in one layer so not to mess up the jam centers.
  • These freeze very well.
  • thirty cookies at three dollars a piece... do the math.

Tuesday, December 13, 2011

Chocolate Almond Cups


These cookies are a fairly new addition to my holiday cookie tray and have made an appearance for at least four to five years. They have been a great addition since their shape is a little unusual for a cookie and more resemble little tarts.
This recipe was discovered in a Pillsbury soft cover cookbook, the kind that are strategically placed close to the check out counter at most grocery stores.
The price on the corner of the book always catches my attention as it reminds me that at one time these books could be picked up for as low as ninety nine cents.
This particular volume was purchased for the enormous price of one dollar and twenty five cents. Lately I've noticed that a dollar and twenty five cents just might cover the tax on the newer editions available today.
After making these cookies for the first time I realized that it required a little extra patience which made me rethink if they were really necessary to complete my holiday baking.
Over the years I've discovered a little shortcut here and there making the process simpler yet still producing a delicious presentable cookie fit for any assorted cookie tray.

Chocolate Almond Cups

Pastry

1/2 cup granulated sugar
3/4 cup butter or margarine (softened)
1 teaspoon vanilla
1 3/4 cups flour
1/4 teaspoon salt

Filling

1/2 cup almonds
1/2 cup semisweet chocolate chips
1 egg
1/4 cup granulated sugar
confectioner's sugar for sifting over tops (optional)
  1. Preheat oven to 350 degrees F.
  2. Grease bottoms and sides of miniature muffin cups (1 1/2 inch diameter) or very small tart shells .
  3. In large bowl beat butter, sugar and vanilla until light and fluffy.
  4. Mix flour and salt together then stir into butter mixture mixing well.
  5. Press rounded teaspoonfuls of dough in bottom and up the sides of prepared pans.
  6. Grind together almonds and chocolate chips ( a food processor will do the job) and set aside.
  7. In a small bowl beat egg and the 1/4 cup of sugar until thick and light coloured then fold in chocolate almond mixture
  8. Place mixture into dough-lined shells being careful not to overfill then bake for 15 to 20 minutes or until filling is set .
  9. Remove from oven and let sit for 2 to 3 minutes then remove from shells and cool on racks.
  10. Lightly sift confectioner's sugar over tops (optional)
  11. Makes about 40 cookies.


Notes, Tips and Suggestions
  • Be sure to use small tart shells or mini muffin tins for dainty cookies, you don't want to make these cookies too large.
  • Make the filling first and place it in the refrigerator before making the pastry. This will allow the filling to firm up a little making it easier to fill the cups.
  • Using a pastry bag and plain round tip to fill the cookies makes the job easier and neater although a teaspoon will also work.
  • These freeze very well.
  • Move over one bite brownies!


The Art of Re-purposing


So what is it? You can be sure that it will not be on the market any time soon and never featured as the gadget of the year.
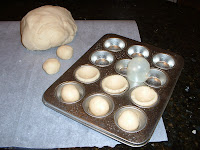
The recipe for Chocolate Almond Cups originally called for using miniature tart shells of various shapes. This required some patience as the dough had to be pressed into each one evenly before filling.
One day I came across some tiny muffin tins in my pantry for which I had never found any use before. It looked like they just might be able replace the miniature tart shells I was using.
They proved to be a little easier to work with but I still had to press the dough in with my fingers which was very time consuming.
They say necessity is the mother of invention. As I scanned the kitchen for something that might make the task easier, my eyes came in contact with the lid of the cooking spray bottle sitting on the counter.
The rest is history. Just the perfect size for pressing the ball of dough evenly into and up the sides of each little tart even producing a neat little edge to hold in the filling (which by the way had a way of escaping over the sides of the little tart pans.)
Could I ask for anything more? It has since won a place among my most prized gadgets!


Retired Miniature Tart Shells


Wednesday, December 7, 2011

Whipped Shortbread Cookies


It's hard to believe that three very basic ingredients can produce such a tasty cookie.
This is another cookie recipe that requires no egg or leavening agent of any kind yet the end product is light, buttery, not too sweet and absolutely delicious.
Of course tins of Danish butter cookies that are stacked on grocery store shelves may convince you that it's the easier route to take.
However, one taste of this whipped shortbread cookie is enough to realize that the little time and effort it takes to bake a batch is certainly worth it.
These cookies have made an appearance at holiday time for more years than I can remember. Even though the the recipe has been rewritten on a fresh new recipe card I am still holding on to the original accordion style leaflet found in a grocery aisle so many years ago.
I enjoy dressing them up as they always make a great addition to any assorted cookie tray .

Whipped Shortbread Cookies
1 3/4 cups flour
1/2 cup icing sugar (sift before measuring)
1 cup softened butter
  1. Sift flour and sugar together and set aside.
  2. Beat softened butter with mixer until light and fluffy.
  3. Add dry ingredients gradually on low speed until well mixed then beat at medium speed for a few seconds.
  4. Pipe with a pastry bag and star tip in different shapes onto an ungreased cookie sheet.
  5. Bake at 350 degrees F. for 15 to 18 minutes or until edges are very lightly browned.
  6. Let cookies rest on the cookie sheet for a few minutes before placing them on a rack to cool.
  7. Decorate as desired. Yield about 40 cookies.


Notes, Tips and Suggestions
  • If you don't have a pastry bag, drop tablespoons of dough onto ungreased cookie sheet. These will not be as attractive as cookies that are piped but the flavour will be just as good.
  • Hard variety of margarine also works well in this recipe.
  • If you wish to decorate with cherries, almonds etc. place them on the cookie before baking.
  • Rolling the cookies in fruit sugar after baking makes them a little fancier.
  • When completely cooled, dip a part of the cookie in melted chocolate (the addition of coloured sprinkles makes for some very happy children)
  • These cookies freeze very well.
  • Once you are done, sit back and admire them, taste test a few just so you know that they taste as good as they look then think of a few people you can share them with.

Tuesday, November 29, 2011

Candy Cane Cookies


Most of us develop a strong desire to bake cookies for the holiday season.
I’ve noticed that even those who are not usually overcome with such an urge will at least venture into cookie baking with some form of pre-packaged mix or tubes of dough.
Each year I promise myself that the following year I will cut down on quantity and variety of cookies I will bake during this season.
It’s just no use making promises I can’t keep since visions of cookies are already dancing through my head when November shows up on the calendar.
Around this time of year I begin organizing favourites as well as adding new recipes of sweet morsels that will soon adorn a few cookie trays and fill a number of festive cookie tins.
I find that giving them away is as much fun as baking them therefore I am allowing myself to have some fun this holiday season also.
I have decided to restart my blog in the New Year but just can’t bear the thought of not sharing a few holiday cookie recipes.
So hard to choose which recipes but the finalists are recipes that are rather easy and inexpensive to make. Hope they become some of your favourites also!


Candy Cane Cookies

I sometimes get my favourite cookie recipes from the most unlikely places.
This recipe was printed on a Christmas card I received one year from a special friend. Each time I make these cookies she fondly comes to mind.

1/2 cup shortening
1/2 cup butter or margarine
1 cup confectioner's sugar (sift before measuring)
1 egg
1 teaspoon vanilla
2 1/2 cups all purpose flour
1 teaspoon red food colouring
superfine sugar for rolling cookies in
  1. Heat oven to 375 degrees F.
  2. Using beater mix shortening, butter, sugar, egg and vanilla until well blended.
  3. Sift flour and salt together on a sheet of wax paper then stir into shortening mixture.
  4. Divide dough in half and blend red food colouring into one half of the dough.
  5. Roll a 4 inch strip using about 1 teaspoon of dough from each colour. For smooth, even strips roll them back and forth on lightly floured board.
  6. Place strips side by side, press lightly together and twist like a rope then lightly roll back and forth until the two ropes become one.
  7. For best results, complete cookies one at a time to prevent strips from drying out and becoming too dry to twist.
  8. Place on an ungreased or parchment lined baking sheet and curve top to form handle of cane.
  9. Bake 9 to 12 minutes until lightly browned then leave on cookie sheets to firm up for 5 minutes.
  10. While still warm roll in superfine sugar then place on rack to cool completely.
  11. Yield about 3 dozen cookies.


Notes, Tips and Suggestions
  • Green food colouring can be used instead of red.
  • There is no baking powder or soda in this recipe in case you are wondering.
  • Rolling the balls of dough with slightly water moistened hands makes it easier for the strips to stick together. I moisten a couple of paper towels with water then pat the palms of my hands on them before rolling the dough.
  • If you use this method flouring the work surface for rolling will not be necessary
  • Superfine sugar is also known as fruit sugar or caster sugar, do not use confectioner's sugar for rolling these cookies in.
  • The recipe states a yield of 3 dozen cookies but I like to make them larger and make 2 dozen. Just use about two teaspoons of dough for each ball but make the ropes around 5 inches long.
  • Be creative in the presentation of these cookies...it makes them even more special!