Looking for a specific recipe? Search here:

Wednesday, March 28, 2012

Patate con Baccala


Potatoes and fish seem to be good friends since they've been known to socialize in many dishes. Patate con Baccala, more commonly known to most as Potatoes and Cod are no exception.

This pair is frequently seen enjoying each others company in a delicious pool of tomato sauce surrounded by tasty aromatics and some hearty, crusty bread close by.

My childhood recollection of this dish include one or more weeks of seeing this wooden looking piece of dried fish soaking in a bowl of cold water. A daily change of fresh water would eventually wash away the saltiness and put enough life back into the fish to make it ready for cooking.

My husband’s memories however are a little different.

He recalls being sent by his mother to the local vendor to buy 250 grams of baccala to be cooked for dinner that evening. This cod would have been already re-hydrated by the store keeper and ready for cooking.
He would eventually get home with a whole lot less than the original amount he started out with.
It was a good thing she didn’t ask him to buy the potatoes since he’s the only person I know that also enjoys eating raw potatoes!

My guess is that she hid the potatoes anticipating having to compensate for the missing fish and still be able to make a meal out of what eventually made it home.

We are living in such a time of abundance. There's presently a piece of dried cod weighing just over two pounds sitting in my fridge waiting to be re-hydrated.
I admit, the thought of having to baby sit this piece of fish for days until it’s ready to cook makes me postpone having it on the dinner menu. I do however eventually get around to it with a tasty reward I might add.

You may be interested to know that I’ve been known to substitute fresh or frozen cod for the baccala. Even though the results take second place it's also absolutely delicious.
All these memories and writing about baccala have motivated me to give that piece I have in the fridge a good soak.

In the meantime I’m going to defrost some cod I have in the freezer and make it for dinner tonight.
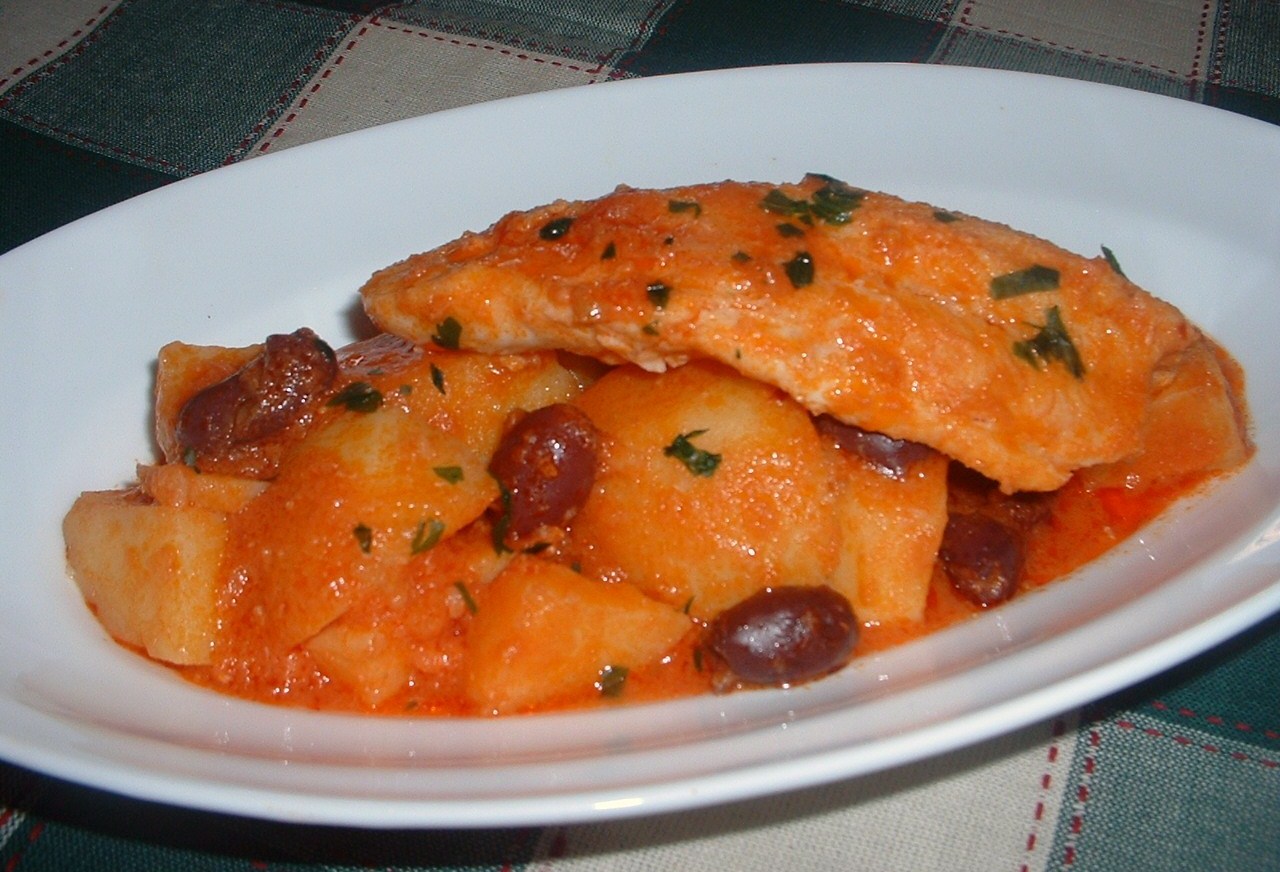
Patate con Baccala
about 600 grams cod fish pieces
about 6 medium potatoes peeled and cut into 2 inch pieces
¼ cup corn oil
2 medium onions peeled and chopped
2 stalks celery, chopped
½ cup pitted Kalamata olives
zest of 1 lemon (yellow part only)
1 16 ounce can peeled plum tomatoes pureed in blender and strained
salt and pepper to taste
1 teaspoon chili flakes (optional)
  1. If using frozen cod, defrost and drain well in a colander.
  2. If using salted cod soak in fresh water making sure to change water frequently until re-hydrated (several days) then drain well.
  3. Place oil, celery, onion, olives and lemon zest in a large skillet and sauté until hot.
  4. Add potato chunks and mix into the ingredients already in the skillet.
  5. Add salt and pepper to taste and chili flakes if using.
  6. Add strained tomato puree to cover potatoes and bring up to a boil.
  7. Lower heat to a simmer and cook covered until the potatoes are cooked but still firm.
  8. Place the cod on top and spoon some of the potatoes and tomato over the fish to cover it.
  9. Cover skillet and let cook until the fish flakes when pierced with a fork.
  10. Remove lemon zest.
  11. Let rest 15 to 20 minutes before serving.
  12. Approximately 3 to 4 servings


Notes, Tips and Suggestions

  • Sole and basically any thick, boneless white fish can be substituted if you don't have cod but to get a truly authentic experience salted cod would be the choice.
  • Make sure to use fish pieces that are one inch or more in thickness.
  • When making a larger quantity, follow recipe until potatoes are cooked in the skillet then place the raw fish into an oven proof baking pan and pour potato mixture over the fish. Cover and bake in a 375 degree F. until fish is cooked.
  • When serving, garnish with chopped, fresh, Italian parsley if desired.

Tuesday, March 20, 2012

Pasta Fagioli


After looking into an unfamiliar subject I have a better understanding of Fusion Cuisine.

Apparently the word fusion gained popularity around the 1970’s but the concept has been around for centuries.

According to one source fusion cooking is described as “basically the mixing of seasonings and ingredients, as well as cooking styles or techniques into one new dish.”

It would only make sense that successful fusion cooking needs not only to mix but blend the above four components into a well balanced dish otherwise it may end up as “confusion” cuisine.

Being familiar with the Italian culture I remember how important it was for immigrants to bring their cultural traditions and perhaps a few pounds of favourite herbs and spices tucked away in their luggage before heading across the ocean.

Each time another member of the family or friend immigrated to Canada you would be sure to smell the fragrance of freshly dried bay leaves and oregano emanating from their suit cases at the airport.

I’m nowhere near the kitchen right now but am definitely experiencing that memorable scent.

In subsequent years there was much excitement over care packages that would occasionally make the boat or air trip from the old country. These parcels were filled with dried herbs, containers of olive oil, fresh almonds and cheese among other interesting things.

These were just a few cultural ingredients that were missed in those days but relatively easy to send over from back home. Eventually, creative substitutions were made for those ingredients that couldn’t make the trip.

Perhaps this was the beginning of a little borrowing from other cultures?

There are times while watching a cooking show I remark that no self respecting Italian would ever be caught adding a certain ingredient to such an authentic Italian dish.

I'm a little more open minded now and confess to being just as guilty when adding different ingredients to someone else’s authentic recipe! Perhaps I’ve been fusion cooking all the while without even knowing it.

My question now is “Could the coming together of a fridge full of various leftovers into a presentable dish be considered Fusion Cooking?”

Pasta Fagioli (Bean Soup)

This is my mother’s authentic Pasta Fagioli recipe also known as Pasta Fazool on many restaurant menus.
It would be interesting to know at which point in the history of this dish that pasta was added. It might very well be that some fusion may have been going on here.
On the other hand the answer could simply be that there weren’t enough beans to go around and the addition of pasta stretched the meal from four to six servings…we may never know!
I believe it’s quite possible that someone somewhere is adding their flair of culture, technique, seasonings and ingredients making this dish a totally different taste experience!

1 package of white kidney beans (750 grams)
2 stalks celery
2 to 3 bay leaves
3 to 4 cloves garlic
1 fresh tomato, seeds removed (optional)
salt to taste
olive oil
  1. Soak dry beans in lukewarm water for 3 hours.
  2. Drain and rinse beans.
  3. Place in a large pot and add enough fresh cold water to cover the beans by 3 to 4 inches.
  4. Add celery, bay leaves, garlic and salt and cook at a slow boil for approximately 1 ½ hours or until tender checking occasionally and adding more water if necessary to keep the beans totally covered.
  5. If you have cooked the entire bag of beans remove portion you may want to freeze for a later time
  6. Add a generous splash of olive oil to the remaining beans and mix with cooked pasta. Serve.


Notes, Tips and Suggestions

  • If you want to complicate things just a little and are not looking for a vegetarian dish throw in a ham hock, end piece of prosciutto or a couple of Italian pork sausages into the pot and cook along with the beans.
  • You don’t have to cook the entire package of beans at once but since they freeze very well why not cook once and prepare for a few future meals.
  • Pressure cooking the beans cuts cooking time down to less than half. (about 40 min. to cook in a pressure cooker)
  • Ditalini or tubetti shaped pasta (short, tube shaped pasta) is traditionally used in this recipe but chopped linguine is what my mother always used and the tradition continues.
  • Rice is a great substitution for the pasta.
  • A sprinkle of hot chili flakes brightens the flavour of this dish.
  • Make sure you freeze a small container for when your make your Minestrone Soup.

Tuesday, March 6, 2012

Provencal Olive Fougasse


I love to collect cookbooks and recipes of every kind.

Occasionally, I find a comfortable chair and go through a cookbook with the same excitement as reading a good novel. I also enjoy cook books with lots of pictures, perhaps with the same enthusiasm as a curious child going through a favourite picture book. There's no doubt that a good picture often inspires me to try the recipe.

Even though I own a few hundred cookbooks, when shopping in a book or department store I'm strangely drawn to the cook book aisle.

It is dangerous to shop with my sister as she also seems to gravitate towards the cook book section. I do my best to convince her that she really doesn’t need another cook book to add to her collection but what she doesn’t realize is that I am actually convincing myself of the same.

This morning I was inspired to brows through some of my cook books. After going through four or five (of the thinner ones) I bookmarked at least ten recipes that had the potential of becoming all time favourites.

I recently read in the forward of a cook book (yes I actually read cook book forwards) that you shouldn’t share a recipe that you yourself wouldn’t make. I totally agree so after having given this recipe a try I will definitely make it again and am happy to share the recipe with you!

In the meantime, may I suggest you dust off your own cookbooks and go exploring. You just might come across a good recipe that you will want to share with me!


Provencale Olive Fougasse

I’ve always wanted to bake a French Fougasse which is actually kin to the Italian Foccacia. At least three versions are pending in my “recipes to try out file” but as I was looking through one of the cookbooks I came across an absolutely delicious picture of the Provencal Olive Fougasse. The image totally captured my interest and I could no longer resist!

The ingredients required are few and it’s quite simple to make. When using a recipe for the first time it's always a good idea follow the steps as closely as possible unless something really doesn't look right. If I decide to use the recipe again a few changes are usually in order that in my opinion work better for me.

Instead of Notes, Tips and Suggestions for this recipe I have included thoughts on Next Time… which might help you out the “first time” you try it for yourself.

¼ teaspoon sugar
1¼ cups warm water
2 ½ teaspoons active dry yeast
3 tablespoons olive oil
3 ¼ cup all purpose flour
¾ teaspoons salt
½ cup chopped pitted Black or Calamata olives
  1. In a medium bowl measure out 3 cups flour and stir in salt.
  2. Fill measuring cup with warm water, sugar and yeast and let stand until bubbly.
  3. Make a well in the flour and add the yeast mixture and olive oil.
  4. Stir until a soft dough forms.
  5. Turn dough out onto a lightly floured surface and knead for about 5 minutes using as much of the remaining flour as necessary to prevent sticking.
  6. Cover dough with bowl and let rest 5 minutes.
  7. With hand, flatten dough on a lightly floured surface and sprinkle with chopped olives.
  8. Fold dough over and knead for about 3 minutes until all of the olives are evenly distributed.
  9. Form into a ball and place in an olive oil greased bowl turning once to grease all over.
  10. Cover with a tea towel and let rise in a warm place for about 45 minutes or until doubled.
  11. Punch dough down and turn out onto lightly floured surface and with hands stretch into a 12x8 inch (30x20 cm.) rectangle
  12. Leaving a 1 inch (2.5 cm.) border all around make 2 rows of 4 diagonal slashes.
  13. Cut 1 inch (2.5 cm.) notches into edge of dough in between slashes.
  14. Gently lift onto greased 17x11 inch (45x29 cm.) baking sheet.
  15. Pull slashes open by at least 1 inch.
  16. Cover with tea towel for about 20 minutes.
  17. Preheat oven to 450 degrees F. and bake in the center of the oven for 20 minutes or until golden and bread sounds hollow when tapped on bottom.
  18. Yield 1 loaf, 10 servings.


Next Time…

  • I will form the bread right onto the greased sheet since it is flattened with the hands. It was really awkward to form it, make the slashes and then pick it up and transfer it to the baking sheet.
  • The slashes need to be wider and more defined since they tend to close up as the bread rises and bakes
  • I will flatten the dough a little more than the 12x8 inches suggested to make a thinner loaf or consider making 2 smaller loaves.
  • I won’t go looking for a 17x11 inch baking pan and use the largest pan I have that will accommodate the size of the loaf and of course fit into my oven.
  • I will not believe that it makes enough for 10 people.
  • I will increase the salt to 1½ teaspoons. (In my opinion the bread seemed to need a little more salt. After checking a few other bread recipes 1 1/2 teaspoons of salt seemed to be standard for the quantity of flour used.)
  • I will make the bread the day before I want to serve it as it gets wonderfully chewier and the flavour develops considerably by the next day.
  • I will not wait so long before I try a new recipe.

Friday, March 2, 2012

Favourite Yeast Rolls


There’s a certain comfort that comes from baking yeast breads on a cold winter’s day.

This recipe had been on my mind for a while and today seemed to be the perfect day for baking. If you’ve yet to be convinced that food brings back great memories I still have some work to do.

I haven’t baked these rolls for at least twenty years and the last time I used this recipe my children were still in grade school. My kids were not big eaters especially during school lunch so I began baking these small rolls to pack in their lunches. These were the perfect size for their small appetites.

I actually amazed myself today when I quickly remembered which recipe I used and exactly where to locate it.

That brought me to another memory.

Many years ago one of my co-workers allowed me to photocopy an entire sizable cook book that belonged to her since I was unable to locate one for purchase.

This may not seem like such a great memory but you should know that Lena and I didn’t see eye to eye on many things. The discovery of our interest in and love of cooking kindled a warm friendship and seemed to make our differences fade into the background. A few years later I was able to help her through a very difficult time in her life.

I don’t remember the title of this book since I didn’t think to photocopy the cover but it’s a great collection of recipes and valuable baking tips.

By coincidence, the huge stack of photocopied recipes fills a four inch black binder that originally held the company's manual for which we worked. The binder is personalized with the company logo and my name on the corner.

How can I not remember those years every time I reach for that binder?

Favourite Yeast Rolls
1½ cups milk
½ cup butter
¼ cup sugar
2 eggs
2 teaspoon salt
2 envelopes active dry yeast
½ cup very warm water
7 to 8 cups sifted all purpose flour
  1. Heat milk with butter in a small saucepan until butter melts and cool to lukewarm.
  2. In a large bowl add very warm water, 1 teaspoon sugar and yeast. Let stand until bubbly, about 10 minutes.
  3. Stir in the cooled milk mixture and beat in eggs.
  4. Beat in about 1 1/2 cups of the flour then stir in enough of the remaining flour to make a soft dough.
  5. Turn out onto a lightly floured surface and knead until smooth and elastic, about 5 minutes, adding only enough of the flour to keep the dough from sticking.
  6. Place dough in a greased large bowl, turn dough to bring the greased side up.
  7. Cover bowl with a clean tea towel and let rise in a warm place away from drafts, 1 ½ hours or until double in bulk.
  8. Punch dough down and divide into quarters keeping dough covered with an inverted bowl until ready to shape.
  9. Divide each quarter piece of dough into 12 equal pieces and shape each piece into about a 6 inch rope.
  10. Tie each rope into a knot and tuck ends under the roll.
  11. Place on greased baking pans, cover with clean tea towel and let rise again in a warm place about 45 minutes or until doubled in bulk.
  12. Bake in a moderate oven (375 degrees F.) for 20 minutes or until golden.
  13. Cool on wire racks and brush tops lightly with butter if you wish.
  14. Makes about 48 rolls.


Notes, Tips and Suggestions

  • I found both rising times given were too long. Check first rising after 1 hour and second rising after ½ hour. If dough has doubled in bulk proceed with next step.
  • If you buy yeast in bulk or are considering doing so 1 tablespoon of yeast equals 1 prepackaged envelope.
  • Rolls are delicious for breakfast with a little butter and jam.
  • These freeze very well