Looking for a specific recipe? Search here:

Friday, December 28, 2012

Homemade Hot Cocoa Mix


I love all things chocolate and a cup of steaming hot chocolate is no exception.

Ready made mixes available in supermarkets always leave me searching for something better since they seldom deliver what the label promises.  I’ve been looking for a good homemade cocoa mix for a while now and have finally come across a recipe that satisfies my craving for liquid chocolate.

The use of good quality cocoa is essential but this recipe adds chocolate pieces for an extra element of creaminess and deep chocolate taste.

Although skim milk powder is an ingredient in the mix and the addition of hot water brings this drink to life, using milk certainly takes it up a notch.

This recipe makes a good amount to last through the cold winter months.  On the other hand if you are feeling generous it makes more than enough to share with others who have an affinity for a good, rich cup of hot chocolate.


Homemade Hot Cocoa Mix


3 cups non fat dry milk powder
2 cups powdered sugar
1 1/2 cups cocoa powder
1 1/2  cups semisweet chocolate chips or chopped chocolate.
¼ teaspoon salt
  1. Wisk together all ingredients in a large bowl.
  2. Working in two batches pulse the ingredients in a food processor until chocolate is finely ground.
  3. Store in an airtight container for up to 3 months.
  4. Makes about 20 servings.

To Make Hot Cocoa

Place 1/3 cup or (4 level tablespoons) of mix into a mug and stir in 1 cup hot water or milk.  Top with whipped cream or miniature marshmallows.

Notes Tips and Suggestions

  • Use water or milk that is very hot in order for chocolate pieces to melt and make sure to stir well.
  • This mix is not too sweet.
  • Substitute white chocolate chips or chopped chocolate for semi sweet chocolate.
  • A pinch of cinnamon or cayenne pepper enhances the taste of hot chocolate.

Friday, December 21, 2012

Cookie Crumb Truffles


In my house this recipe is known as the “other” truffles. The recipe previously posted for Chocolate Truffles although chocolaty and delicious comes with a few challenges. This kind is best made when home alone and very focused on what you are doing. 

Cookie Crumb Truffles are a little more fun to make and actually even more fun if made together with someone else.  It's very important to decorate immediately after shaping into balls while they are still moist for the decorations to stick well. This is where an extra pair of clean hands are appreciated to keep the decorations on the truffles and not on sticky, chocolate covered hands.

It has become somewhat of a tradition for my daughter and me to make these truffles together every year. We began making them during her younger years therefore she was given the job of coating them with sprinkles and other decorations while I took on the messier job of forming the truffles into small balls. 

Not much has changed through the years as I am still the one with the sticky chocolaty hands and she is still the decorator.

It’s also in the decorator’s job description to carefully inspect the truffles making sure the size and appearance is just right, a quality control of sorts. When any misshaped or less than beautifully decorated truffle is detected it's instantly taste tested by the decorator.

I suppose this is one of the perks of such a high demanding job although the one with the sticky chocolaty hands has the all important job of taking the final count!

Truffles

½ cup whipping cream (35%)
1 cup semi sweet or milk chocolate chips
1 cup graham wafer crumbs
½ cup finely chopped peanuts, walnuts or pecans
Chocolate sprinkles, coconut, chopped nuts, cocoa etc.
  1. Bring cream to a boil.
  2. Remove from heat and stir chocolate chips, blend until smooth.
  3. Stir in remaining ingredients.
  4. Chill until mixture is firm enough to roll (1 to two hours).
  5. Roll into balls then finish off with decorations.
  6. Refrigerate, makes about 36 truffles.


Notes, Tips and Suggestions

  • Placing the sprinkles into small baggies makes coating the truffles easier with less mess.  This is especially helpful when making them with younger children so you won’t be sweeping up sprinkles for the next two weeks. This effective method was devised by the decorator a few years back and I am the thankful cleanup crew!  
  • Use Oreo or chocolate cookie crumbs instead of graham crumbs for a darker, tasty version of this truffle.
  • Milk chocolate chips can be substituted for the semi sweet chips.
  • Give equal parts semi sweet chocolate chips and almonds a rough chop in a food processor for an interesting truffle coating.
  • Place truffles in small paper liners for special presentation.

Friday, December 14, 2012

Classic Pizzelle


It's definitely time to give the oven a rest after two solid weeks of cookie baking. But it isn't over yet…for cookie making that is.

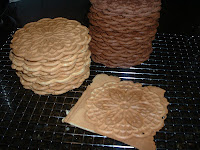
Pizzelle are traditional Italian waffle cookies originating from the Abruzzo region of South Central Italy.  The batter usually consists of flour, butter, sugar, eggs and various flavourings and baked in a Pizzelle iron.  The patterns on both sides of the iron resemble snowflakes and the first Pizzelle irons were hand held over a  hot stove top burner flipping it over as each side cooked.

I am very happy to say the invention of the electrical version has made things a little easier.

I’ve owned my pizzelle iron for many years but unfortunately a couple of years ago it unexpectedly stopped working.  Thanks to my in house appliance doctor and some minor surgery it was restored back to working condition.

Sensing that its days were numbered I invested in a new one and unfortunately I was right.  My old one has been admitted for repeat surgery and I'm anticipating a favourable prognosis since my new iron just doesn’t measure up.

Pizzelle are light, flavourful, crisp cookies.  They can be eaten just as they are or formed into a bowl for serving ice cream or fruit.  Wrapping them around a wooden dowel while still warm makes  great cannoli shells ready to be filled with a favourite filling.  I always add a little extra batter than called for which spills over the actual Pizzelle shape allowing me to cut off the excess resulting in uniform and very neat looking cookies.

On a previous post for Amaretti Cookies I suggested that some words are best left untranslated.  The translation for Pizzelle is literally “round and flat” or "little pizzas".

Need I say more?

Classic Pizzelle
3 eggs
1¾ cups flour
¾ cups sugar
1 tablespoon vanilla or anise flavouring
½ cup butter or margarine (melted and cooled)
2 teaspoons baking powder
  1. Beat eggs with mixer until frothy then gradually add sugar.
  2. Add cooled butter/margarine and flavouring and continue beating until smooth.
  3. Sift together flour and baking powder and add to egg mixture beating until well mixed. (Dough will be thick and sticky.)
  4. Bake in preheated Pizzelle Iron.
  5. Makes approximately 25 to 30 Pizzelle.
Chocolate Pizzelle
  1. Add ¼ cup cocoa, ¼ cup sugar and ¼ teaspoon baking powder to dry ingredients for Classic Pizzelle.
  2. Blend into egg mixture until smooth.
  3. Makes approximately 25 to 30 Pizzelle.

Notes, Tips and Suggestions

  • Blend ½ cup finely chopped walnuts or pecans into batter for a variation.
  • If extra batter is used for full size Pizzelle make sure excess is trimmed while cookie is still warm for best results.
  • If extra batter is used to get a good shaped Pizzelle  the yield will be a few less than the amount stated above. The pieces trimmed off need not go to waste, they are a special treat for the baker.


To make a Pizzelle Bowl press warm Pizzelle between two  same size bowls for a few seconds then trim off excess cookie.


Friday, December 7, 2012

Mocha Cherry Snowballs


The pile of cookie recipes on the kitchen counter is dwindling and it looks like I might be finished baking sometime early next week. Different shapes, textures, flavours and sizes make an interesting assortment on a tray and two batches of each variety is usually enough to enjoy with plenty to give away.

These cookies are surely kin to the Mexican Wedding Cookies  for which I have previously posted a recipe.  Again, no apparent Mexican spices can be found in them and I’m not sure why someone saw fit to call them Mexican Mocha Balls unless Mexican Chocolate was called for in the original recipe.

I usually make them each year not only because they are delicious and quite easy to make but their  texture and taste is a little different from the rest of the cookies.

This year while rolling these cookies in granulated sugar for finishing touches they reminded me of little chocolate snowballs. I began thinking of possible new names and finally decided to rename them Mocha Cherry Snowballs.

This recipe was not in the plan to post therefore steps of preparation pictures are not available but rest assured that they are a very simple cookie to make not requiring much explanation.

No matter what these cookies are called it doesn’t change the fact that they make a tasty addition to any cookie assortment whether they be Mexican or not!

Mocha Cherry Snowballs (a.k.a. Mexican Mocha Balls)


1 cup butter or margarine (hard margarine) at room temperature
½ cup granulated sugar
1 teaspoon vanilla
2 cups flour
¼ cup unsweetened cocoa
1 teaspoon instant coffee granules
¼ teaspoon salt
1 cup finely chopped nuts (walnuts, pecans, peanuts etc.)
1/3 cup drained and chopped maraschino cherries
granulated sugar to roll them in after baking
  1. With mixer beat together margarine/butter vanilla and sugar.
  2. In a separate bowl sift together flour, cocoa, instant coffee and salt.
  3. Stir dry ingredients into wet ingredients.
  4. Stir in nuts and maraschino cherries.
  5. Form into 1 inch balls and place on an ungreased cookie sheet. 
  6. Bake in a preheated 325 degrees F oven. for 20 minutes.
  7. While still warm, roll in granulated sugar.
  8. Cool completely on rack.

Notes, Tips and Suggestions
  • Blend the nuts and maraschino cherries by hand, it’s much easier.
  • If the dough seems a little dry just keep working it with your hands until it comes together.
  • Use a good quality cocoa, it makes all the difference. 
  • These cookies freeze well.