Looking for a specific recipe? Search here:

Friday, August 29, 2014

Canning Tomatoes


Summer is quickly coming to an end and soon shoveling snow will take the place of tending the garden.  Once again the summer has slipped by in the busyness of life.

The reality that summer days are coming to an end is apparent in the full bushels of tomatoes waiting to fill last year’s empty mason jars. As sure as tomatoes ripen at the end of summer there’s always a tomato sauce making day shortly thereafter!

Making tomato sauce has been a long standing tradition.  Just as my mother and generations before her preserved the tomato harvest for the coming year the tradition continues in many homes.  The method of preparation may have changed over the years but tomatoes are still preserved to be enjoyed in a hundred and one delicious ways.

For us, yearly sauce making day became quite an event . Family members working together, each assigned to a particular task in preserving what seemed endless bushels of tomatoes.  At the end of the day the satisfaction of a job well done outweighed the exhaustion of a very long day.

With the passing years one by one all the helpers have retired.  It’s down to one now and I’m presently looking at several bushels of tomatoes visualizing the full jars that will eventually be stored in the pantry.

This year the tomatoes will not be made into sauce but packed into mason jars instead. They can be readily turned into sauce at a later date by putting through a food mill or blender.  It’s a faster way to process the tomatoes instead of making sauce all at once, not to mention a more manageable task for the one remaining tomato processor!

Tomato day…a full day’s work but a full year of good eats!


They say a picture is worth a thousand words, the following are pictures of the basic tomato canning steps my way with less than a thousand words!


1.There's something about tomatoes in bushels,
not the same as those sold in boxes.  First you
have to get some tomatoes, they are plentiful
this year.


2 .Time to get all cleaned up in a cool water bath. 


 3. All clean...what's next?


4. Remove stem end of tomato and make a slit not quite
cutting it in two. This makes the next step easier and
a little less messy.


5. Squeeze out water and as much of the seeds as possible
and place in colander to drain.  Not all of the seeds will be
removed, not to worry they will be discarded when using
the tomatoes to cook with.


6. Using clean jars add 1/2 to 1 teaspoon of salt
just because my mother did.  I like to think of the preserving
qualities of salt and continue to do the same.


7. A canning funnel is a great tool for keeping rims
of the jars clean.


8. Using a tamper  press down the tomatoes eliminating
any air pockets.  Add a few tomatoes at a time
then press down for best results. Keep adding tomatoes
and pressing down until jar is full making sure to leave a
good 3/4 inch head space for expansion.


9. Wash and gently boil two piece lids for 10 minutes
then keep warm until ready to use.


10. Handy magnetic tool helps lift lids out of boiling
water preventing fingers from getting burned while
the rest stay hot for each remaining jar.


11. Wipe rims of jars well to ensure a good seal then
screw lids only until properly closed.  Don't over
tighten as it may cause an improper seal.


12. Now for a hot bath in the canner.  After the water
 comes to a boil process for 45 minutes.


13. Time's up!


14. If you need the canner to do another batch this tool
helps remove the hot jars safely otherwise leave the
jars in the canning pot until cool enough to remove.
Place jars onto a tea towel to absorb the water from
the canner and let rest until cool.


15. When completely cooled down check the lids for
a proper seal.  The metal cap should be sucked into
a concave position and no movement present when
pressed down with the finger.  A beautiful sight...
all lids properly sealed!


Notes,Tips and Suggestions
  • When ready to use the tomatoes either put through a food mill or process in a blender.
  • The food mill will remove the rest of the seeds and peel.  I prefer the blender since the peels totally blend with the tomatoes actually thickening the sauce.  If the blender is used a quick strain through a fine mesh sieve will remove any remaining seeds.
  • Store filled jars in a cool dark place for best results. 
  • Should any jars not seal properly, replace lids and process again for about 15 minutes otherwise place in refrigerator and use as soon as possible.
  • If the ring part of the two piece lid is not damaged or dented they can be used many times.  I suggest purchasing new metal caps each year.  For pennies a cap chances of getting a good seal is almost a sure thing. It's not worth taking a chance reusing metal caps  and having to deal with an improper seal. 

Friday, August 22, 2014

Tomato and Cucumber Salad


Every Spring we purchase a good number of cucumber seedlings and plant them in the garden waiting to enjoy the tasty fruit of our labour.  Consequently we lose about half of our plants to an elusive creature that likes to sever the tender young stems leaving the plants lifeless on the ground!

Hoping to outwit this cucumber plant destroyer, this year we decided to transplant the small, tender seedlings into larger pots and wait for them to develop a stronger stem before planting into the ground.  I suppose not having much confidence in our newly hatched plan was the reason at least three times the usual quantity of plants were purchased.

I’m not sure if it was a matter of successful planning or the culprits acquiring a taste for some other tasty plant this summer finally leaving the cucumbers alone!  To say the least, family, friends and neighbours have been enjoying our bumper crop of cucumbers. I enjoy the feeling of walking past the cucumber displays in the grocery store knowing I can go home and pinch one off a plant!

In my opinion the best way to eat a cucumber is freshly picked, peeled and enjoyed, however a few cucumber radish salads are enjoyable as well.  Although many enjoy cucumber, tomato salads I have never been able to reconcile the texture of tomatoes and cucumbers in the same bite.  This week the two textures finally met in my version of a tomato cucumber salad.

Chopping the tomato and cucumber into smaller pieces made a more palatable experience. The addition of chopped red onion, a little olive oil, salt, pepper, a squeeze of lime juice and fresh oregano added extra taste and texture. Don't forget a little heat from the chili pepper!

Serving the salad on an Asian ceramic soup spoon was a great way of getting the perfect bite!


Tomato Cucumber Salad

These are the basic ingredients, quantities depend on amount you want to make.

cucumber
tomatoes (Roma is the best variety as retains its texture best and is less watery.)
red onion
fresh oregano or dried if fresh not available
salt and pepper to taste
lime juice
olive oil
hot chili, optional
  1. Chop cucumber and tomato into bite size pieces, place in a bowl.
  2. Dice red onion and chili pepper, add to the tomato and cucumber.
  3. Add fresh chopped oregano or a sprinkle of dried.
  4. Dress with a little olive oil and lime juice.
  5. Toss all ingredients together and serve.


A Cucumber Story


Baby picture...


BF's but not forever...


Hiding behind the leaves...


Hiding behind the fence pole, as still as can be...


Hid from us until we finally took it into custody...


Keeping an eye on this one, obviously trying to open
the latch on the gate and escape! 


THE END

Friday, August 15, 2014

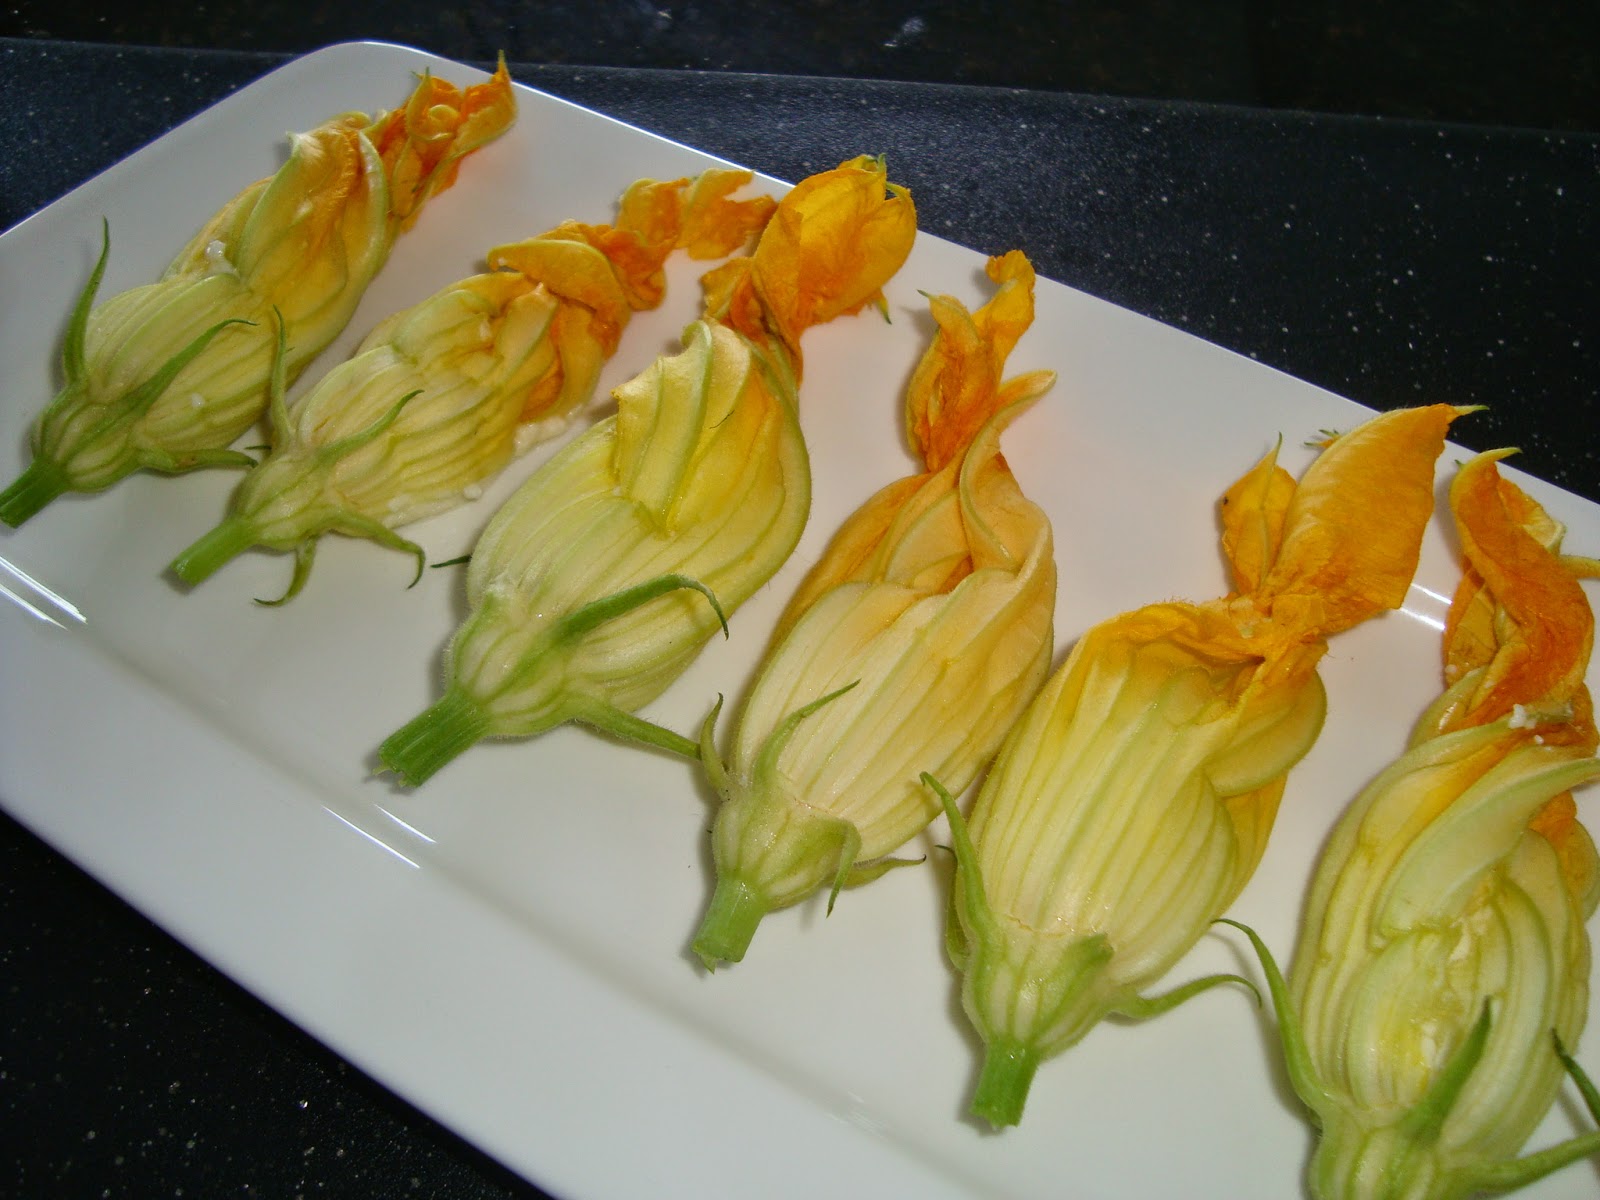
Ricotta Stuffed Zucchini Flowers


As if the versatility of the zucchini isn’t enough, the subtle orange, delicate flower of the zucchini plant has delicious possibilities of its own.

While growing up I don’t recall ever having the pleasure of zucchini flowers gracing our table. I suppose it was because my parents never included zucchini plants in their small vegetable garden. Thanks to the generosity of some very kind friends we are gifted with a few lovely bouquets each year during the summer months.

These flowers are hard to come by in most grocery stores perhaps because of their perishable nature and I would venture to say they might not be in such high demand.  I remember coming across some in a specialty market once, a rare occurrence and the price attached to them required a double take to make sure it wasn’t a mistake! Worth their weight in gold!

For lack of a more creative way to use these zucchini flowers they've always found their way into a fritter batter.  The time had finally come to try something new with the blossoms that came our way this past week.

I'd been curious to try this recipe for Ricotta Stuffed Zucchini Flowers for some time now and couldn't let the opportunity pass me by once again.  Having never made them before, I contemplated making another batch of fritters instead, not wanting to chance wasting such a precious ingredient.

No doubt zucchini flower fritters are delicious but this recipe for Ricotta Stuffed Zucchini Flowers is like dressing them up for a very special occasion.  Exquisite!


Ricotta Stuffed Zucchini Flowers
12 to15 zucchini blossoms (depends on size of flowers)
1 cup of ricotta cheese
1 large egg
1/3 cup of freshly grated Parmigiano-Reggiano (or favourite cheese)
1 clove of garlic, minced
4 fresh basil leaves, finely chopped
3/4 tsp salt
3/4 cup of all-purposed flour
1 cup of soda water
1 1/2 cups of vegetable or canola oil (for frying)
  1. Mix together the ricotta, freshly grated Parmigiano-Reggiano, chopped basil, garlic, egg and salt.
  2. Place the mixture into a piping bag. If you don't have one fill a plastic freezer bag instead and cut the corner off.
  3. Cut the stems from the flowers. If you need to clean the flowers, gently wipe them with a damp paper towel.
  4. Whisk together the soda water and flour. The mixture will seem quite frothy, it just needs to rest a little. Set aside.
  5. Gently open the petals. It may take a few tries as they can be entwined.
  6. Remove pistil from the center of the flower by snipping it off with scissors.
  7. Gently pipe about 2 tablespoons of the prepared filling into the flowers.
  8. Twist the top of the petals together to close the flowers, set aside.
  9. Heat the oil in a medium size pan to medium high heat.
  10. Individually dip each flower into the batter. Hold it over the bowl to let the excess batter drip off.   
  11. Gently lower it into the hot oil. Cook the flowers until they are lightly golden and crisp, about 2-3 minutes.
  12. Remove flowers from oil and drain on paper towels, allow to rest for about 5 minutes to firm up ricotta before serving. 


Notes, Tips and Suggestions
  • A little mozzarella in the center would be a great addition to these.
  • If no basil is available replace with finely chopped flat leaf Italian parsley.
  • Fried a few with no filling, just battered... light, crisp and delicious! 
  • Make sure the batter is quite fluid, shouldn't be too thick.  Add a little more club soda if necessary. 
  • Don't overfill the flowers with ricotta, a little goes a long way.
  • Fry only until lightly golden, do not overcook.
  • These are best eaten within a short time of frying.

Friday, August 8, 2014

Panko Chicken Breast Cutlets


Some recipes have been passed down through generations and followed religiously without question. Last week I made a small change in one of the recipes I watched my mother make and I’ve made in the same way for the last forty years.  Not a huge change but a huge difference!  It was just a matter of adding one ingredient before another but the result left me shaking my head wondering why it had taken so long to make the change.

This chicken breast recipe is another one I watched my mother make over and over again.  At some point the discovery of the wonderful texture of Japanese Panko bread crumbs made way for the first change in the preparation of these cutlets  This resulted in a more crispy, light bread crumb coating than the traditional Italian variety.

A few years later the Cream Puff Girl who by the way does not live by Cream Puffs alone shared some information with me which made way for another change. Instead of dredging in flour before dipping into the egg mixture the chicken breasts spend a few hours tenderizing in the egg then coated with the Panko before frying.

One less step and very tender, juicy chicken… so worth the changes!

Panko Chicken Breast Cutlets
I usually don’t measure the ingredients for this recipe but just eyeball the quantities of egg and breading mix needed.  Below are listed approximate measurements for three chicken breasts sliced in half to make six portions.

3 chicken breasts each breast sliced in half to make 6 cutlets
2 eggs
about ¼ cup grated cheese
about 1 tablespoon chopped, fresh Italian parsley
salt and pepper to taste

Bread Crumb Coating
about 2 cups panko bread crumbs
2 tablespoons grated cheese
about 1 tablespoon dry oregano
salt and pepper to taste
corn oil to fry cutlets
  1. Beat together eggs, cheese, parsley, salt and pepper until well mixed.
  2. Place chicken breast portions into the mixture and allow to marinate for at least a couple of hours in the refrigerator. (These can be prepared earlier in the day and be ready to bread later.)
  3. In a shallow container or on a piece of wax paper mix the bread crumbs, cheese, oregano, salt and pepper well.
  4. Place chicken breast in the crumb mixture then turn over and coat the other side lightly pressing the bread crumbs with hand making sure they adhere to the chicken.
  5. Cutlets can be fried immediately or placed in the refrigerator until ready to fry.
  6. Fry each side on medium high heat until golden and cooked through.  Time will depend on the thickness of the chicken breast.
  7. Drain excess oil by placing cutlets on paper towel.
  8. Serve with lemon wedge.


Notes, Tips and Suggestions
  • Instead of frying, add a little oil into a rimmed baking sheet and place in a 375 degree F. oven until oil is heated then carefully place prepared cutlets in the pan.  Brown on both sides turning once. Heating oil prevents excess oil absorption.
  • If possible, after coating with bread crumbs allow to rest in the refrigerator for a while, this seals the bread crumbs on the chicken.
  • These cutlets are delicious served hot, warm and even cold. They also make great sandwiches!

Friday, August 1, 2014

Raspberry Coconut Dark Chocolate Scones


I was reluctant to post this recipe fearing that I may seem to be scone obsessed.

I wasn’t looking for this recipe, or another way to enjoy more coconut for that matter.  While searching for a completely different recipe I came across a picture of these Raspberry Coconut Dark Chocolate Scones quite unexpectedly.

One glimpse of the picture was all it took to forget what I was originally looking for and to this day I still can’t remember what it was. It was interesting to see a different shaped scone from the usual wedge shape. I also liked the idea of the fruit and chocolate being rolled up in the center instead of being dispersed throughout the scone.

My first attempt at making these confirmed this was an excellent recipe however a little messy to put together for my liking and the scones weren’t as presentable as the ones in the picture.  After a few adjustments to the method of preparation, I ended up with a good looking as well as tasty scone with a lot less kitchen cleanup!

I’ve made these scones three times since coming across this recipe and anticipate a very long, sweet relationship!

Raspberry Coconut Dark Chocolate Scones

½ cup unsalted butter cut into small pieces (or grated, see Notes, Tips and Suggestions)
½ cup milk
½ cup Greek Yogurt (or sour cream)
2 cups all-purpose flour
½ cup castor sugar (aka. superfine or fruit sugar)
2 teaspoons baking powder
pinch of baking soda
1 cup raspberries
about ¼ cup dark chocolate cut into small pieces
½ cup shredded coconut
  1. In a medium bowl combine all of the dry ingredients.
  2. Add the cold butter and with a fork lightly mix it into the flour mixture.
  3. Mix together milk and yogurt.
  4. Add to butter/flour mixture and stir until the dough begins to come together.
  5. With palm press mixture down then fold over and press down again, repeat until most of the dough has come together.
  6. Place a piece of plastic wrap on counter and sprinkle with flour, place dough on plastic wrap and shape into a rough rectangle.
  7. Add a little flour on the top of dough and place another piece of plastic wrap on top.
  8. With rolling pin roll into a 8 X 11 inch rectangle.
  9. Remove top plastic wrap and place raspberries, coconut and chocolate down the center of dough.
  10. Using bottom plastic wrap to help, roll dough as tight as possible to form a log shape.
  11. Twist the ends tightening the roll.
  12. Unwrap the plastic wrap and slice into 8 to 9 slices.
  13. Place on parchment lined baking sheet and brush with a little cream or milk.
  14.  Bake in a preheated 450 degree F oven for about 20 minutes or until golden.
  15. Cool on rack and lightly dust with a little confectioner’s sugar.


Notes, Tips and Suggestions.
  • The method of preparing these scones includes any adjustments made to make things a little easier.  I have surely spared many messy kitchen cleanups!
  • I replaced the Greek yogurt with sour cream since I’m more likely to have sour cream in my fridge than Greek yogurt, with good results.  I don’t recommend using low fat though.
  • Instead of cutting the butter into the flour mixture with a pastry blender try coarsely grating very cold or even frozen butter instead.  I find this method an excellent way of dispersing the butter more evenly. If butter is grated while not frozen pop it into the freezer after grating for a few minutes before using.
  • If the raspberries are on the mushy side try placing them in the freezer for a few minutes to firm them. This will help the berries remain intact and prevent the juices from being squeezed out of them while rolling the dough, not to mention less mess!
  • For one less cup to clean, measure the 1/2 cup of milk in a measuring cup then add enough yogurt or sour cream to measure 1 cup.
  • Don't like coconut? Don't let this stop you from making these delicious scones, omit it! 
  • In case you're wondering...I didn't forget the egg... no eggs required!