Looking for a specific recipe? Search here:

Friday, July 27, 2012

Eggplant Parmigiana


 It’s an absolute shame that this vegetable was at one time considered poisonous and grown only as an ornamental plant.

No matter if called Melanzane in Italian, Aubergine in French or just plain old Eggplant in English it’s a tasty and most versatile vegetable.

I grew up enjoying various preparations of eggplant and have continued making some of my mother’s recipes exactly the way she has and still does.  However, I chose to update her recipe for marinating eggplant by developing a much simpler method which has resulted in a better product in my opinion.

Her recipe for Eggplant Parmigiana remains original since I haven’t come up with anything that could make it taste any better than it already does.  After trying a few different ways of making this dish I have always returned to my mother’s recipe and consider it a true comfort food.

We have never planted eggplant in our garden but this year we took in two homeless plants from my son and his wife who rescued them from under a “for free” sign. We found a home for them among the herbs since they were generous enough to share some of their space with the late comers.  The plants have adapted well to their new surroundings but if they bear any fruit remains to be seen.

There are a number of eggplant varieties available on the market and it depends on the recipe which one would be the better choice. Since eggplant has a very mild flavour the addition of various other ingredients help to bring out its unique taste. 

Among the varieties I have come across and used are the classic or regular eggplant as well as the Asian, Italian, Indian and Sicilian.  If I had to choose between them it would be very hard but the creamy white flesh and little to no seeds of the Sicilian eggplant wins my heart and is the variety I would reach for over the others for frying and marinating.  The small Indian variety lend themselves very well for stuffing while the long, slender Chinese eggplant are a good choice when the recipe calls for chunks or cubed pieces.

Simply called an eggplant does nothing to elevate this vegetable to its rightful place in the vegetable world.

Aubergine…hats off to the French for giving it the sophisticated name it truly deserves!

Eggplant Parmigiana

These are approximate measurements and depend on the size of eggplant used.
The volume of eggplant increases considerably after dredging in flour, dipping in egg mixture and fried.
An average size eggplant will yield approximately 6 servings when serving as a side dish.

1 medium size eggplant
3 to 4 large eggs
Salt and pepper to taste
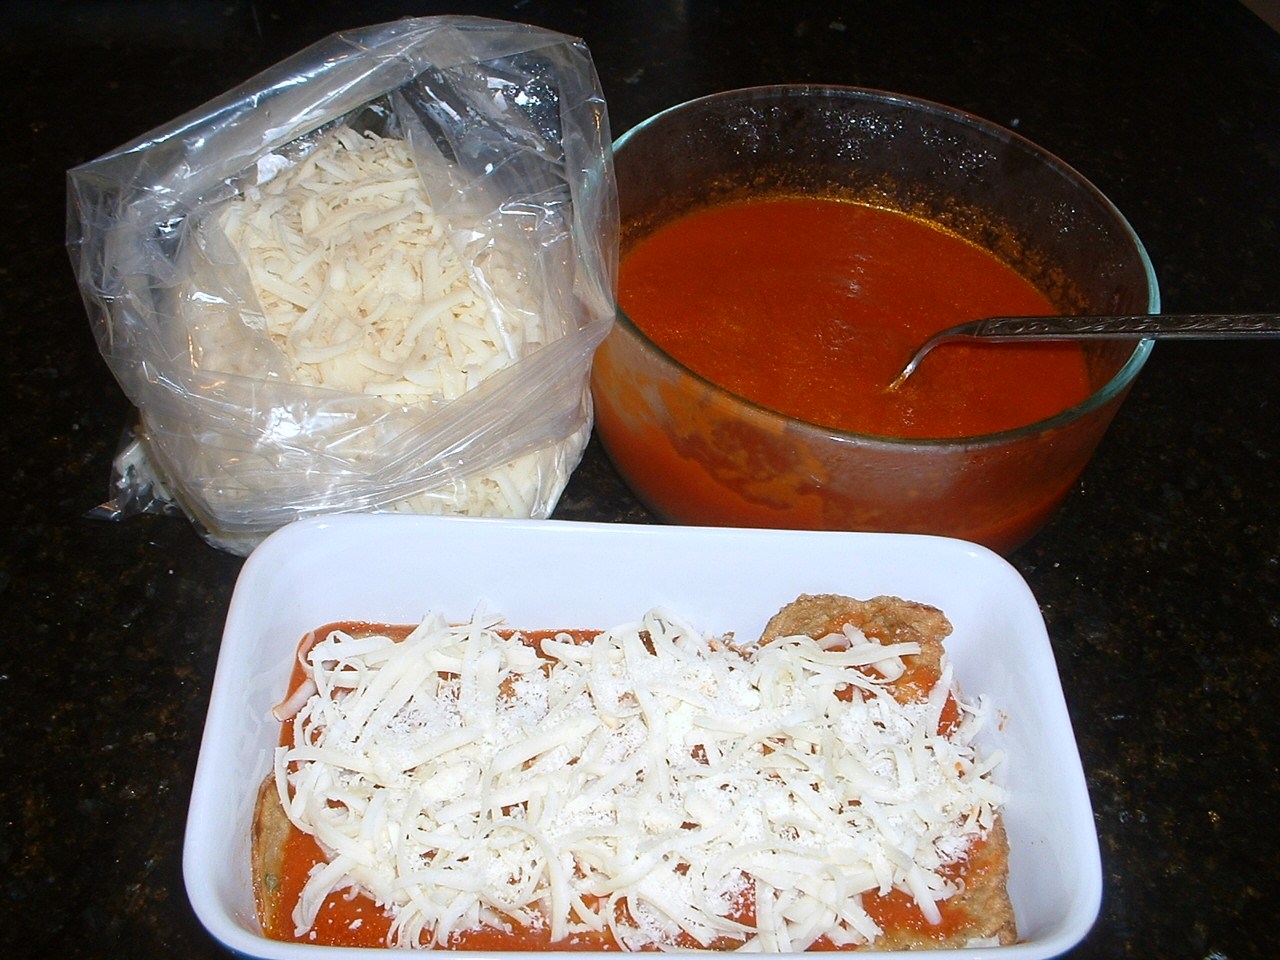
½ cup grated cheese, parmigiano,  crotonese or your choice (extra for layering))
grated mozzarella cheese for layering (optional)
flour for dredging
¼ cup finely minced fresh Italian parsley
Enough prepared tomato sauce to layer and cover top of eggplant slices.
( Marinera or Meat Sauce both work well in this recipe.)
 vegetable  or corn oil for frying.
  1. Peel and thinly slice eggplant (cutting it lengthwise gives you larger slices and takes less time to prepare and fry.)
  2. Combine and beat together eggs, grated cheese (not mozzarella) salt, pepper and parsley.
  3. Dredge eggplant slices in flour, dip in egg mixture making sure to cover slices completely.
  4. Fry until golden on both sides turning once.
  5. Drain on paper towels to remove excess oil.
  6. Cover bottom baking dish with a layer of tomato sauce, add a layer of eggplant slices, cover with a thin layer sauce, sprinkle with additional grated cheese and a layer of mozzarella if using.
  7. Continue layering until all of the eggplant is used up then end with a layer of sauce and grated cheese on top.
  8. Cover with foil and bake in a 375 degree oven until hot and bubbly 30 to 45 minutes.
  9. Let rest for about 20 minutes before serving.


Notes, Tips and Suggestions
  • This dish is delicious served at room temperature..
  • Leftovers make great sandwiches.
  • It tastes even better warmed up the next day.
  • I usually make this with left over Sunday meat sauce; sometimes making extra sauce on purpose with intention of preparing parmigiana in the coming week.
  • Peeling eggplant is optional; I prefer it peeled since the skin can be a little chewy.
  • Veal or chicken parmigiana can be prepared by using the same method for eggplant omitting the layering step. Prepare meat as in frying eggplant, place layer of sauce in baking pan, place one layer of meat then cover with sauce and cheese.  Bake until hot and bubbly approximately 30 minutes.

Friday, July 20, 2012

Raspberry Apple Muffins


Raspberry season is already upon us and I was surprised to learn that there are ten varieties and picking season stretches from July to October.

I've washed and put away my baskets after strawberry season since there is no inclination to go picking any raspberries.

After my one and only raspberry picking experience I vowed to never to return. Unlike strawberry picking  it's a much slower process and can be very tedious.  After feeling like I had been out in the fields for hours I began checking my basket to make sure there wasn’t a hole in the bottom since I wasn’t seeing much fruit for my labour.

The web sites advertising picking locations for strawberries invite to just come and pick.  On the other hand  those advertising raspberries encourage bringing a lunch and drinks. Perhaps this is to avoid raspberry passing out experiences due to the length of time it takes to fill a basket!

I suppose that I could make an effort and give it another try but my aversion to those eight legged creatures that roam about on the bushes gives me a good enough reason to pass it up this year once again.

However I do not wish to dissuade you, everyone should experience at least one trip to the raspberry fields in their life time. Don't let this opportunity pass you by!

Rather expensive to purchase in the winter months fresh raspberries do go on sale once in a while and make for a delicious treat.

Raspberries purchased frozen are excellent for adding to baked goods so I don’t see much advantage in picking my own to store in the  freezer. Their delicate nature makes it difficult to freeze properly therefore I'm leaving that up to the experts.

This recipe for Raspberry Apple Muffins was originally an Apple Muffin recipe.  One day not knowing exactly what to do with a handful of broken, frozen raspberries at the bottom of the bag I decided to add them to the apple muffin batter.

Absolutely delicious!  Since there were many little pieces they dispersed more evenly and didn’t bleed into the batter as much as fresh raspberries would.

The sweetness of the apple combined with the tartness of the raspberries made for a wonderful "marriage".

The "reception" was amazing and enjoyed by all!


Raspberry Apple Muffins


2 cups flour
2 teaspoons baking powder
¼ teaspoon baking soda
½ teaspoon salt
1 teaspoon finely grated lemon zest (optional)
2/3 cups milk
1 egg
1/3 cup vegetable or corn oil
¾ cups brown sugar
2 medium unpeeled red apples cored and sliced
3/4 cup raspberries or as much as you please.
Granulated sugar for tops (optional)
  1. Sift together flour, baking powder, baking soda and salt into a medium bowl.
  2. Combine milk, egg, oil, brown sugar and apples in a blender and blend until well combined and you can only see flecks of the apple peel.
  3. Make a well in your dry ingredients and add all of the wet ingredients plus the lemon zest if using.
  4. Mix together just until combined being careful not to over mix.
  5. Gently and with a few strokes mix in the raspberries
  6. Fill paper lined muffin wells to about ¾ full and bake in a preheated 375 degree oven for about 25 minutes or until golden in colour.
  7. Remove and while still very warm dip tops into a bowl filled with granulated sugar if desired.
  8. Yield 7 to 8 large muffins.

Notes, Tips and Suggestions

  • These muffins freeze very well.
  • If using frozen raspberries break them up a little to get a little raspberry in every bite and be sure to add them to the batter while still frozen.
  • Blueberries instead of raspberries could also be a good combination.
  • Adding the sugar on top is not necessary but makes them extra special when eating them for a snack. 
  • Remember, you don't have to peel the apples, less work and more nutritious!

Friday, July 13, 2012

Strawberry Lemon Basil Mousse


While expanding my knowledge on this absolutely amazing fruit I came across some very interesting facts.

Strawberries can be found in both the northern and southern hemispheres and are grown in every state in the US, every province in Canada, all over Europe, Australia and even in Iran. They can grow by the sea, in the woods, on mountain tops and may I add even among blades of grass.

This brings me to a childhood memory that has not come to mind for many, many years.  Could I ever have imagined writing about this in my food blog decades later?

While growing up we spent a lot of time with our aunts, uncles and cousins.  In those days being newcomers to a new land and unfamiliar way of life made for strong family ties.

On one particular family outing, I believe around the Niagara Falls area we stopped to have a picnic.  Leaving the adults to set things up the cousins went exploring nearby.  While running about I remember stopping short noticing what I thought to be some little ruby gems hiding in the grass.  Instead they were small patches of tiny wild strawberries glistening in the sun.  They were hardly larger than the size of peas but perfectly formed, ripe and delicious.

I don’t remember if we shared the find with our parents.

I was also surprised to learn that the Strawberry capital of the world is found in Belgium the country of my birth. Picking strawberries there would certainly be an adventure but I’m totally content to pick strawberries from a field about a ten minute drive from my home.

Time and weather permitting, we usually make our yearly trip to the nearby strawberry fields and fill our baskets to overflowing.
These are quite perishable so a plan has to be in place as to how they will be consumed.

A batch of jam captures the goodness in jars to be enjoyed at a later date and the rest usually end up on top of a scoop of home made Vanilla Ice Cream or in a bowl topped with a mound of whipping cream.

I’ve made home made strawberry ice cream several times but this year I found a recipe for Strawberry, Lemon Basil Mousse which inspired me to try a new strawberry recipe and also incorporate some of the Lemon Basil from the garden.

On a final note, it’s interesting to find out that strawberries are a member of the rose family.  After some thoughtful consideration I have come to the conclusion that I would rather enjoy a bouquet of strawberries!


Strawberry Lemon Basil Mousse

2 egg whites
¼ teaspoon cream of tartar
pinch of salt
1 cup whipping cream (35%)
½ cup plus 2 tablespoons confectioners’ sugar
1 cup pureed strawberries
2 tablespoons lemon or regular basil finely chopped
  1. Puree enough washed and hulled strawberries to equal 1 cup
  2. Beat egg whites with cream of tartar and salt, gradually add sugar and beat until stiff and glossy, set aside.
  3. Whip cream until soft peaks form.
  4. Gently fold strawberry puree into whipped cream.
  5. Fold egg whites into strawberry mixture.
  6. Fill dessert glasses and chill for at least 1 hour.
  7. Makes approximately 5 to 6 servings.


Notes, Tips and Suggestions

  • After refrigerating for one hour, serve within 2 hours as the mixture tends to separate.
  • No basil?  That’s okay just make Strawberry Mousse!
  • Thanks to a good forward from a good friend I got a great tip!  With all the gadgets to hull strawberries out there who would have guessed that a straw would beat them all.  Thanks Marianne!!
  • After making the mousse for this post and indulging in a portion I froze the remaining mousse since there was no one at home to share it with.
  • Later that week it was son-in-law approved as a wonderful frozen treat. We also agreed that if the mixture is placed into Popsicle molds it would make great frozen mousse on a stick!

Has This Product “passed your eyes” Yet?


Although statistics reveal that 1 in 20,000 eggs may carry salmonella food poisoning the dreadful feeling that we might end up with that one egg may keep us away from recipes using raw eggs or egg whites.

I was aware that pasteurized eggs and whites were available on the market but had never used them.
I have a few good recipes using raw egg whites and the dreadful thought does cross my mind when making those recipes.

For those who are not aware of this product it can easily be found at the local supermarket and  may calm the fear of encountering that particular bad egg.. Since it comes in 250 ml.cartons equivalent to 8 egg whites it may be more than you need at one time. Whatever is unused can be frozen successfully for up to 3 months.

I would suggest freezing in 2 tablespoon amounts equaling 1 egg white inside ice cube trays.  This way you can use whatever is needed at the time.  When frozen, store the cubes in a zip lock bag in the freezer to free up your ice cube trays.

On the other hand I found a website that teaches how to pasteurize your own eggs should you want to take that route.  However, I think I’ll pass this option for the time being!

http://www.howtobaker.com/techniques/baking/how-to-pasteurize-eggs/


Captured Strawberry Goodness!

Friday, July 6, 2012

My Cherry Pie


 After surviving a long winter of fruit originating from foreign destinations or which has been waiting in storage since the last harvested crop the sight of local cherries and strawberries restore my faith in a sweet and juicy taste experience.

There’s nothing like the enjoyment of fresh fruit in its proper season and cherries have been plentiful this year so we’ve been eating them to out heart’s content. 

There have been years when cherries disappear as fast as they appear on the market and the sweet window of opportunity passes me by much to my disappointment.

Although I don’t preserve this beautiful fruit in any way this season marks the time for a few delicious cherry pies.

Once the season is over we remain fully satisfied until the following year since in my house it’s against the law to purchase any store bought pies, cherry or any other kind for that matter. The use of canned cherry pie filling is forbidden as well.

This recipe did not come from a book or magazine nor was it passed down from ages past. It originally came from the desire to make a pie that was simple, not too sweet but able to capture the ultimate cherry flavour of the season.

They say that life is a bowl of cherries, just make sure you get rid of the pits before making a pie!


My Cherry Pie


1 ½ pounds ripe cherries (approximately)
½ cup granulated sugar
¼ cup water
2 ½ tablespoons corn starch
½ teaspoon almond extract (optional)
pastry for a double crust pie (see Apple Pie recipe)
  1. Prepare recipe for a double crust pie.
  2. Wash, stem and pit cherries and place into a saucepan.
  3. Add water and simmer on medium heat for about 5 minutes or until juices begin flowing from cherries.
  4. Thoroughly mix together sugar and corn starch and add to cherries.
  5. Stir until mixture thickens then remove from heat.  Cool.
  6. Roll out and place pastry into pie plate, fill with cooled cherry mixture.
  7. Place pastry on top, seal and make several cuts on top to allow steam to escape.
  8. Sprinkle with sugar then bake in a preheated 375 degree oven until crust is golden brown.  Cool.
  9. Serve with homemade Vanilla Ice Cream or lightly sweetened whipped cream.


Notes, Tips and Suggestions
  • Cherry filling as well as the pie crust can be prepared the day ahead and refrigerated.  The next day assemble the pie and bake.
  • For a better browning bottom crust, place a cookie sheet in the oven while preheating then place pie on the hot cookie sheet to bake.
  • If preferred, after pitting cherries, cut in half before making into a filling.
  • Almond extract is optional but a small amount enhances the flavour of the cherries.