Looking for a specific recipe? Search here:

Tuesday, October 27, 2009

Shrimp Fried Rice


My father was born in Bari, a picturesque city situated on the Mediterranean coast of Italy.

He would often tell us many exciting tales of the deep sea fishing adventures he experienced during his younger days.

His love of fishing was only surpassed by the love for any kind of fish that would end up on his plate.

After immigrating to Canada you would think that his fishing days on the Mediterranean would become a distant memory. On the contrary, several years later he became very good friends with the owner of a fish market. There he spent countless hours helping out just for the love of it.

Because of this connection with the owner there was always an abundance of many varieties of fish and shellfish on our dinner table.

My father always knew the best way to prepare every kind of fish he brought home and my mother was always ready to cook it up.

During that time we were witness to some pretty strange looking creatures from the deep.

Octopus, squid, shark and skate were only a few varieties we enjoyed not to mention razor clams, conch and sea urchins that made dinner time very interesting.

We have enjoyed many of these dishes in my own family throughout the years. No written recipes for these either. The ingredients and method of preparation were just ingrained into us by watching, listening and enjoying.

The next few posts are dedicated to my father who introduced us, taught us how to prepare and encouraged us to enjoy all that the sea has to offer.

The following recipe for Shrimp Fried Rice is definitely not one that we enjoyed while growing up.

I found this simple recipe in a rather large cook book titled The New World Encyclopedia of Cooking, a fitting title as I entered the ”new world” of being responsible for the daily preparation of dinner. During my newly married years this recipe was one of my first attempts at cooking fish.

The recipe looked simple enough to try out and has become another “tested and true” recipe that I have turned to for many years.

As the years have gone by I've become more adventurous in preparing some of the fish dishes that I enjoyed while living at home.


Shrimp Fried Rice


½ cup long grain rice
1 pound fresh or frozen shrimp
½ cup chopped onion
4 tablespoons corn or peanut oil
2 to 3 tablespoons soy sauce
freshly ground black pepper to taste
thinly sliced scallions or chives for garnish (optional)

  1. Cook rice until tender, drain and refrigerate (chilling prevents rice from sticking to skillet during frying process.)
  2. Clean, devein if necessary and cut shrimp into pieces.
  3. In a heavy 10 inch skillet heat oil and add chopped onion, sauté until slightly softened.
  4. Add shrimp and cook about 2 minutes until barely cooked (don’t overcook.)
  5. Mix in the chilled rice and soy sauce, add pepper.
  6. Cook over low heat for about 5 minutes stirring occasionally with a fork to keep rice kernels intact.
  7. Makes 2 to 3 servings.

Notes, Tips and Suggestions
  • I have made this recipe without soy sauce and it was just as good. If you omit the soy sauce remember to add salt to taste and a couple of tablespoons water to keep the rice moist.
  • Size 21 to 25 shrimp per pound work well cutting each shrimp into 3 pieces. If you use smaller size shrimp no need to cut them up.
  • My favourite variety of shrimp are the frozen zipper back Black Tiger. These are very tasty and have already been deveined. Just defrost in slightly salted cold water, peel and cut up.
  • Rice can be cooked earlier on in the day since it will be refrigerated before use.
  • Recipe can be doubled or tripled to feed a larger crowd.


Thursday, October 22, 2009

Daisy Coffee Cake


During my “gainfully employed” years an elderly co-worker gave me several recipe booklets that had belonged to his mother. It was no secret that I was really interested in baking and probably not having anyone else to pass them on to decided that I could make some use of them.

A recipe for “Daisy Coffee Cake” immediately caught my eye and I decided to try it out even though it involved using yeast. I have to admit that I wasn’t as comfortable using yeast as I am now and I think this recipe gets major credit for helping me get over any fear I may have had.

I had much success in making this coffee cake and made it often but I guess not often enough to remember the exact measurements of ingredients in the recipe.

One day I decided to bake a couple of coffee cakes but couldn’t find the recipe booklet and to this day I don’t know what happened to it.

After days and months of searching and even contacting the company who advertised their brand of butter in the recipe, all my efforts were unsuccessful.

Years later, while having a phone conversation with my sister she began telling me of a recipe she had come across in a magazine.

I admit I was just half listening to her until the ingredients she was listing began to sound very familiar. At this point she was totally unaware of the recipe I had lost years ago.

I suddenly interrupted her and cried out “That’s my recipe!”
After some explaining I grabbed a pen and paper and made sure to document the recipe before anything else happened to it.

What a feeling, it was just like being reunited with a long lost friend!

Daisy Coffee Cake


1 tablespoon active dry yeast
¼ cup warm water plus one teaspoon sugar
2 large eggs
¼ cup granulated sugar
½ cup sour cream
½ cup butter (measure, then melt)
1 teaspoon salt
2 ¾ to 3 cups all purpose flour
coconut for sprinkling over top

Filling
½ cup coconut
½ cup sugar
2 teaspoons finely grated orange zest
  1. Soften yeast in the ¼ cup water and 1 teaspoon sugar.
  2. In a bowl combine eggs, sugar, sour cream salt and 6 tablespoons of the melted butter.
  3. Add the dissolved yeast and stir.
  4. Stir in 2 ¾ cups flour then knead in as much of the rest of the flour to make a soft dough then knead for a few minutes until a smooth and elastic dough forms.
  5. Place in a greased bowl and let rise in a warm place for 1 ½ hours.
  6. Punch dough down, divide in half and let rest for 10 minutes.
  7. With rolling pin roll into two 12 inch circles, brush with remaining melted butter.
  8. Combine ingredients for the filling and spread over the two circles.
  9. Cut each circle into 12 equal wedges then roll each wedge into a crescent.
  10. Grease two 8 inch round pans
  11. Place 2 of the crescents in the middle of the pan and arrange the remaining 10 crescents around the pan. Repeat with the second circle of dough.
  12. Cover and let rise for 30 minutes.
  13. Bake in a preheated 350 degree F. oven for 25 to 30 minutes.
  14. Remove from oven and cool on wire cooling rack. While still warm, brush top with glaze and sprinkle with coconut.
Glaze
½ cup sugar
½ cup sour cream
¼ cup orange juice
¼ cup butter
  1. Combine all ingredients for glaze in a small saucepan.
  2. Stir over medium heat until sugar dissolves.
  3. Bring mixture to a boil and boil 3 minutes stirring constantly.
  4. Remove pan from stove and cool down for a few minutes.


Notes, Tips and Suggestions

  • If top of coffee cake starts to brown too soon, cover loosely with foil during last 5 to 10 minutes of baking.
  • The recipe for the glaze makes a generous amount. I usually cut the recipe in half and find that it’s enough. I suggest you make the full amount the first time then decide for yourself.
  • These coffee cakes freeze very well and taste great warmed up.

Thursday, October 15, 2009

Apple Rolled Oat Squares


A trip to the apple orchard this past week end proved to be most enjoyable and educational since I was introduced to a variety of apple that I had never tasted before nor even heard of.

It was great to see so many come out with their small children and experience the most beautiful sight of fruit laden apple trees. Hopefully, this sight will confirm the fact to these children that that apples don't grow on grocery displays.

In the past it was common to see bus loads of children taking trips to the apple orchard, unfortunately this event seems to be on the decline.

At first I was a little disappointed to find out that the season was over for the Macintosh, my favourite apple. In my last post I commented on what I thought was the perfect combination of Macintosh and Granny Smith for apple pies and was hoping to pick some.

The Spencer variety however may quickly become the "apple of my eye” and take the place of the Macintosh. I don’t recall coming across this variety in any grocery store I frequent but will definitely be on the look out for them in the future.

One bite from this apple was all it took. It was sweet and juicy and the taste reminded me of a Macintosh but unlike the Macintosh was firm and definitely crisper.

A little research revealed the Spencer variety to be a cross between a Macintosh and a Golden Delicious. No wonder I found it to be so good!

I tried a combination of Spencer and Cortland apples for our Thanksgiving Apple Pie and it was extra good! Apparently, the Cortland variety is also an offspring of the Macintosh.

It’s also good to know that the Cortland as well as the Spencer do well in fruit salads and fruit platters since they don’t brown too quickly when cut and exposed to the air. I will have to try using these apples for Apple Crisp before they’re all gone.

Apple Rolled Oat Squares are a “portable” apple crisp. Except for the small amount of baking soda in the recipe, all the other ingredients are the same as for a traditional Apple Crisp.

I’ve always used Macintosh apples in these squares but the Spencer is a great substitute.

This dessert has been a favourite lunch bag treat for many years!

Apple Rolled Oat Squares

1 ½ cups all purpose flour
¼ teaspoon baking soda
¼ teaspoons salt
1cup firmly packed brown sugar
1 ½ cups rolled oats (quick cooking)
¾ cups butter or hard margarine

Filling
2 large apples (peeled, cored and thinly sliced)
3 tablespoons melted butter
1 teaspoon cinnamon
¼ teaspoon finely grated lemon peel
  1. Sift flour, soda and salt into a bowl, mix in brown sugar and oats.
  2. Using a pastry blender, blend butter in until mixture is crumbly.
  3. Press half the mixture into bottom of a well greased 9x9 inch square pan.
  4. Combine filling ingredients and toss to coat apple slices evenly.
  5. Spread apples over base and sprinkle remaining crumbs over the apples evenly.
  6. Press down gently.
  7. Bake in preheated 375 degree oven for 35 to 40 minutes until top is golden and apples are tender.
  8. Cool in pan on a cooling rack and cut into squares, store in airtight container.


Notes, Tips and Suggestions

  • If using these squares as an addition to a cookie tray, a light dusting of confectioner’s sugar on top dresses them up for the occasion.
  • These squares actually taste better when eaten the day after they are made and can also be frozen successfully.
  • Mix a batch of these ingredients when you have a few spare minutes, place into a zip lock bag and refrigerate. When you're ready to make the squares you only have to prepare the apples, assemble and bake. This idea works for Apple Crisp topping as well.

Wednesday, October 7, 2009

Apple Pie


I don’t think I’ve ever followed a written recipe to make apple pie. The ingredients are simple and for the most part depends on individual taste.

One thing is for sure, once you've tasted a home made apple pie nothing else will measure up.

Some like their apple pie bursting with apples while others prefer a minimal amount of filling. Some like it sweet; some like it on the tart side and the texture of the filling either mushy or chunky is all a matter of preference.

One thing we may all agree on is that this pie requires a perfect crust. Light, flaky and golden are the right adjectives that come to mind.

I use to be so meticulous in crimping the edges of the pie crust to perfection but in the last few years have come to appreciate a more rustic look in the finishing touches.

A combination of apples like Granny Smith and Macintosh makes a perfect filling that pleases most. The Macintosh breaks down in baking while the Granny Smith retains a more firm texture. Together, I believe they make a perfect combination in a pie.

I’ve made more apple pies than I care to count; it has always been a family favourite. A scoop of Simply Vanilla Ice Cream crowns this dessert like nothing else, except for using fresh harvest apples of course!

Apple Pie


6 Macintosh apples
3 Granny Smith apples
(depending on size of apples use more or less as required)
1/3 to ½ cup granulated sugar
1 ½ to 2 teaspoons ground cinnamon
2 teaspoons corn starch
  1. In a small bowl blend sugar, cinnamon and corn starch, set aside
  2. Peel, core and slice apples (about ½ inch thickness, thicker for chunkier texture)
  3. Place apples into a bowl and add sugar mixture, toss until well coated.
  4. Roll out bottom pastry dough large enough to hang about 2 inches over sides of pan.
  5. Place the apples into the bottom crust.
  6. Roll out top dough just large enough to cover the apples and place on top.
  7. Brush water all over top crust then bring bottom crust over top crust making necessary folds in the dough to seal the apples in.
  8. Sprinkle a generous amount of sugar over top of pie.
  9. Flute by making several cuts on top pie crust to allow steam to escape
  10. Bake in a preheated 375degree oven until golden brown.
  11. Cool on a wire rack.


Notes, Tips and Suggestions
  • I was taught to make the top pastry larger, tuck it under the bottom pastry then crimp the edges. Instead, placing the larger crust on the bottom and folding it over the top crust not only gives you a great rustic look but also helps prevent the juices from escaping and making a mess in your oven.
  • To ensure a golden bottom crust, place pie on the lower rack for about 20 minutes at the beginning of baking. Then place on middle rack until top is golden.
  • Dark metal and glass pans give you a golden bottom crust. Aluminum pans reflect the heat and less browning occurs.
  • Instead of brushing water over top crust, milk or lemon-lime soda works well.
  • If edges of pie are browning too quickly a strip of aluminum foil wrapped around the edges helps prevent burning.
Pie Crust

1 ½ cups all- purpose flour
¼ teaspoon salt
½ cup vegetable shortening
5 tablespoons ice cold water
  1. Place flour into a bowl and add salt.
  2. Add vegetable shortening and blend in with pastry blender until shortening becomes the size of small peas.
  3. Add water one tablespoon at a time mixing it in with a fork before adding the next tablespoon.
  4. Flatten the mixture with the palm of your hand until it begins sticking together then fold the mixture in half, flatten with hand again and repeat the folding over and flattening until it forms a dough ((fold over 4 to 5 times.)
  5. Place the dough on a lightly floured surface or pastry cloth.
  6. Cut into 2 pieces making one piece a little larger for the bottom crust.
  7. Shape each piece of dough into a round ball then flatten with hand.
  8. With a lightly floured or stockinet covered rolling pin, begin at the center of the dough and roll outward, make a quarter turn with the dough and repeat rolling from the center until it is large enough to cover and hang over pie plate by 2 inches.
  9. Roll remaining dough in the same manner until large enough to cover the filling.


Notes, Tips and Suggestions

  • Folding over of the dough is the same process used when making puff pastry. The shortening becomes layers between the flour and makes for a flaky texture.
  • Make sure to use ice-cold water, this will keep the shortening cold, again resulting in a flaky crust.
  • If you plan to make a pie within a few days, make and roll out the dough required and refrigerate up to 3 days. Filling and baking is all you have left to do. The dough will be very cold making it perfect for a great crust.
  • For easy transferring of crust to pie plate, fold rolled dough half way over the rolling pin then transfer to pie plate and unfold.
Blending In

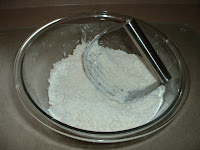
Unless you are using a food processor to make your dough the pastry blender is a must have tool.
It successfully blends the shortening into the flour uniformly and very quickly.


Pastry Apparel


Using a lightly floured pastry cloth makes rolling out the dough really easy with no extra addition of flour that can result in tough dough. No fear of sticking when using this cloth.
The stockinet over the rolling pin serves the same purpose, less flour used and a no stick performance.
Should you not have these tools on hand, rolling the dough between 2 lightly floured sheets of wax paper is the next best thing.

Friday, October 2, 2009

Apple Cake


Facts and myths on the history of the apple made for a very interesting read about this very popular fruit.

The unnamed fruit in Genesis has traditionally been considered an apple, the symbol of temptation.

In Greek mythology, the golden apple of discord brought about the Trojan War and consequently the fall of Troy.

Snow White’s stepmother used an apple to poison her and Isaac Newton’s legendary inspiration was a falling apple.

I may be stretching things, but it is certainly interesting to note that apples are harvested in the fall and this common thread seems to run through the apple’s history.

The “fall” of man, the “fall” of Troy, Snow White “falling” asleep and the “falling” of Newton's apple. Perhaps only coincidence?

Personally, I could “fall” for the dozens of varieties of apples available today. They’re all called apples but the colour, taste and texture of the different varieties could very well classify each as a distinctly unique fruit.

The apple tree itself has evolved from tall towering giants, (like the one in our back yard, unfortunately all tree and no apples) to dwarf trees and even trees that look like large vines. This makes apple picking easier and safer as it may prevent a bad “fall” from trying to pick the apples on the branches of very tall trees (now I'm stretching it).

Apple picking on a crisp, sunny October day has a way of making pleasurable, lasting memories.

It reminds me of all the school trips to the apple orchard I went on with my children and the excitement when their class helped turn those beautiful apples into a tasty apple sauce for snack time.

A basket or bushel of freshly harvested apples is a beautiful picture of autumn. The pages of many recipe books are filled with apple recipes that could keep us cooking and baking an entire lifetime.

I love hand written recipes and some of my favourite are those that were given to me in the person’s own handwriting.

A co-worker wrote down this recipe for Apple Cake for me many years ago. She didn’t have many friends in the company we worked for and was mistreated by many. We became good friends and one day she brought a piece of this apple cake for me.

It was so good that I asked her for the recipe. She told me that it was strictly a family recipe but would make an exception and allow me to have it.

I hardly remember any other co-workers during those years but every time I make this cake I remember Sara and the years I had the privilege of being her friend.

I’ve come across similar recipes but this one is very special to me and I have been making it for 30 years. If this isn’t “tested and true” nothing is.

If I could ask her, I’m sure she wouldn’t mind if I passed the recipe on to you.


Apple Cake


2 eggs
1 cup granulated sugar
1 teaspoon vanilla
½ cup vegetable oil
1/3 cup orange juice
1½ cups flour
¼ teaspoon salt
2 teaspoons baking powder
2 medium size apples peeled and thinly sliced

Filling


2 apples peeled and thinly sliced
¼ cup granulated sugar
2 teaspoons cinnamon
  1. Grease a 9x9x2 inch square baking pan.
  2. Mix apple slices sugar and cinnamon in a bowl and set aside.
  3. Sift together flour, baking powder and salt, set aside.
  4. In a medium bowl beat eggs and vanilla then slowly add sugar and continue beating until light and fluffy.
  5. Slowly beat in oil.
  6. Beginning and ending with the dry ingredients, add to egg mixture alternately with the orange juice until batter is smooth.
  7. Spoon 2/3 of the batter into pan. Place a layer of apple filling on top of the batter then spread remaining batter over the apples.
  8. Bake in a preheated 350degree oven for 40 to 45 minutes until golden brown in colour.
  9. Remove from oven place on cooling rack and cool inside the pan.
  10. When cooled, sift icing sugar over top and cut into squares or rectangles.


Notes, Tips and Suggestions

  • To prevent the bottom of cake from browning too quickly, place a sheet of foil wrap on the bottom rack after the fist 20 minutes of baking.
  • Set oven at 325 degrees if using a glass pan.
  • Slice apple very thinly for best results and a single layer works best.
  • Macintosh or Golden Delicious apples work well in this recipe.
  • For an attractive presentation place each piece of cake in a paper muffin cup.
  • This cake is best eaten the day it’s made, refrigerate any leftovers loosely covered.

Appealing Device

When you need to prepare a lot of apples this tool does the job very neatly and with minimum waste.

Just crank the handle and it peels, cores and slices.


Cored and Wedged


One downward motion makes coring and cutting the apple into equal size wedges simple.

Spend a little extra and buy a good quality tool. Apples can be very hard and I had to replace two before I purchased this one.

The larger handles make it easier to use.