Bread is a staple in every culture, without it a meal just doesn’t feel complete.
With the many grains and flours available on the market today we’re able to bake hundreds of varieties of this ever popular food.
There’s no sweeter or more comforting fragrance that comes from a loaf of bread baking in the oven.
In the 1950’s when floods of Italian immigrants came to Canada, one of the first things they missed from back home was their traditional hearty breads.
My mother often tells of the bitter disappointment she and other immigrants experienced when they arrived to this new land of opportunity. The only bread available in Canada at that time was loaves of soft white sliced bread.
Among the other challenges they faced, this was one of the hardest. It made them yearn for the familiar tastes of the country they left behind.
Did I say they came to a new land of opportunity?
In a short time they began baking their own bread which helped make the transition less painful.
I guess the rest is history. The number the Italian bakeries that exist in this country today confirms the fact that fresh baked bread and confections are sought not only by Italians but many other cultures as well.
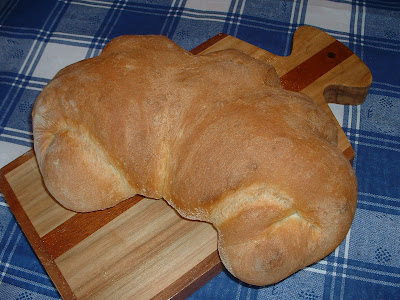
My childhood memories include coming home from school and opening the door to an unforgettable aroma. This is an experience that I have shared with my own family many times. In keeping with tradition, I made this bread in one of the same shapes my mother use to make for us.
Old Country Basic Bread
4 ½ to 5 cups bread flour
2 cups warm water
1 tablespoon salt
1 tablespoon active dry yeast
1 teaspoon sugar
Cornmeal (for sprinkling on baking sheet)
- Dissolve the sugar into the warm water, add yeast and stir. Set aside until yeast rises to the top and foams.
- Into a large bowl, measure 3 cups of the flour, mix in the salt then add the yeast mixture.
- With a wooden spoon stir until well mixed.
- Gradually add the rest of the flour and keep stirring until it forms a soft dough that is no longer sticky. This usually happens after the total of 4 ½ cups of flour have been added but depends on the moisture content of the flour.
- Turn dough out onto a floured surface and knead 6 to 8 minutes or until dough is smooth and elastic.
- Form into a ball and place into a clean bowl, rub some vegetable oil over the surface of the dough and place a clean tea towel over top.
- In a warm place away from drafts, allow dough to rise 1 ½ to 2 hours or until doubled in volume.
- Turn dough out on to a floured surface and knead about 1 minute until smooth.
- Shape dough and place on a baking sheet that has been sprinkled with cornmeal.
- Cover with clean tea towel and let rise again in a warm place for 30 to 40 minutes or until doubled in volume.
- Preheat oven to 400 degrees F. and bake for 20 minutes. Lower oven temperature to 375 degrees F. and bake approximately 30 minutes more or until bread is a deep golden colour. Remove from baking sheet and cool on wire rack.
- To shape dough as in picture above, after the first rising, knead dough 1 minute then form into a ball.
- With rolling pin roll ball of dough to about 1 ½ inch thickness in an oval shape.
- Starting at short end, roll dough (it will not be uniform since you are rolling an oval shape.) Place roll on prepared baking sheet open end on the bottom and shape into a crescent. With scissors snip outer edge of crescent 4 to 5 times. Allow second rising and bake as above.


Notes, Tips and Suggestions
- All purpose flour works well in this recipe but bread flour definitely yields superior results.
- Try substituting equal amounts of whole wheat or semolina for the white flour.
- Before placing bread into preheated oven for baking, place an empty pan on the lower rack of the oven and fill with boiling water. (use a pan that is at least 2 inches deep and fill ¾ full.) This will create moisture that allows bread to rise again before forming a crust. This also produces a thicker crust.
- Before shaping the loaves, divide dough in half and make two smaller loaves. This way you can give one loaf away for someone else to enjoy!
- You’ll definitely need a dish that goes well with the heartiness of this loaf. The next post may help you out.

No comments:
Post a Comment