Looking for a specific recipe? Search here:

Sunday, February 26, 2012

Chicken Drumsticks in White Wine


When the kids were quite young and a whole roasted chicken was on the day’s dinner menu I would add a few more chicken drumsticks to the roasting pan.

This was of course to avoid any problems over who of the four would get the only two drumsticks on that bird!

I would then make a silly comment like “Oh look this chicken had six legs.”
I don’t remember a time when any of them challenged that statement. It was as if they knew it couldn’t possibly be true but trusted me enough to not ask any questions.
On the other hand it may have just been that they really didn’t care how many legs that chicken had as long as there were enough to go around.

This recipe for Chicken in White Wine was one that my mother often made for us. She would cut up a whole chicken and prepare it this way but I’ve found that chicken drumsticks come in very handy for this recipe.

You can make ten as easily as making two, the only difference being the size of skillet used and proportion of ingredients.

No need to worry about serving these to under legal drinking age family or guests since the alcohol in the wine evaporates leaving behind a delicious, sticky glaze.

This qualifies it as another “finger licking good" chicken recipe.

Chicken Drumsticks in White Wine

chicken drumsticks
white wine
salt
pepper
bay leaves
vegetable or corn oil
garlic (optional)
  1. Wash drumsticks and pat dry
  2. In a skillet on high heat add 2 to 3 tablespoons oil until hot then add chicken.
  3. Lightly brown on one side then turn over and brown other side.
  4. If using garlic, finely chop 1 to 2 cloves and add now (it may burn if you add it sooner).
  5. Add 3 to 4 bay leaves and season with salt and pepper.
  6. Add a small amount of wine then lower heat to medium.
  7. Allow the wine to evaporate before adding more. (Do not add too much wine at one time, just add enough for it to evaporate in a few minutes.)
  8. Continue this process until chicken is golden and juices run clear making sure to occasionally turn the chicken over for even cooking.
  9. Add the last amount of wine, cover skillet and remove from heat (the last addition of wine will make sure you end up with some pan juice.)
  10. Remove bay leaves and serve.


Notes, Tips and Suggestions

  • Although white or rose wine is the best choice I’ve used red when that’s all I have on hand. It tastes just as good but the chicken will take on the red wine colour.
  • You can make this earlier in the day then add a drop more wine when reheating.

Sunday, February 19, 2012

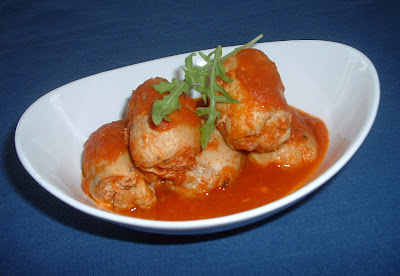
Chicken Thigh Roll-ups in Tomato Sauce


On a previous post for Tomato Meat Sauce I included a recipe for beef or veal roll-ups. These are also known as involtini or braciole and are very traditional in Italian cuisine.

You can be sure that every Italian cook boasts their interpretation of this recipe to be the best one of all.

In my mother's day meat was not as affordable as it is today and she tells me that it was a real treat to see braciole in the traditional Sunday pot of sauce.

She used chopped garlic and pancetta in her recipe. I replaced the pancetta with regular or smoked ham and omitted the garlic altogether mainly because it made them more appealing to my children.

I tried making this recipe with chicken breast but they tended to become rather dry and stringy. I did however enjoy the taste they gave to the tomato sauce so I tried using boneless chicken thighs instead hoping for better results.

The thighs were very moist, tender and tastier than breast meat for sure. Using smoked meat as part of the stuffing gives the sauce a mild smoky flavour which is a little different than the usual but well received by all at the Sunday dinner table..

As far as I know using chicken thighs is not part of a traditional recipe that has been around for years. However, I am curious to find out if this version of roll-ups have made their way into pots of sauce other than mine.

If not, you first heard of it here and I may have started a new tradition!

Chicken Thigh Roll-ups

I’m not posting exact amounts as you can make as many as you want and season them to taste. It is said that a picture is worth a thousand words so I included a few therefore saving me a multitude of words.

boneless chicken thighs
black forest ham, smoked turkey or smoked chicken (preferably shaved)
grated cheese such as Parmigiano or Crotonese
salt
pepper
Italian parsley (chopped)
  1. Unroll and spread chicken thighs on a piece of wax or parchment paper (you will be stuffing the inside of the thigh)
  2. Sprinkle with salt and pepper to taste.
  3. Place smoked meat, grated cheese and parsley on the thigh and roll up like a jelly roll.
  4. Roll meat in a piece of plastic wrap
  5. Take both ends of the plastic wrap and in a forward motion spin until meat roll takes on a cylindrical shape.
  6. Tuck the ends of the plastic wrap under the roll and secure with 3 toothpicks (you will be pushing the toothpicks right through the plastic wrap)
  7. It is important that these are frozen solid at this point. (cook from the frozen state to ensure that they don’t unroll.)
  8. Make your sauce as in the Meat Sauce recipe on the previous post and bring it up to a boil.
  9. Remove plastic wrap from rolls (do not remove toothpicks) and add to the sauce.
  10. When the sauce comes up to a boil again lower heat to medium and cook gently for about 45 minutes.
  11. Remove toothpicks before serving.
  12. Serve sauce on your favourite pasta.


Notes, Tips and Suggestions
  • It may seem like it takes a lot of initial preparation for this recipe but the reward will come the day you just have to unwrap and add them to a pot of simmering tomato sauce.
  • For something different, try using a small amount of raw meatball mixture as the filling in the roll-ups. A combination of ground veal and pork or veal and chicken seasoned just as you would for meatballs makes a tasty filling.
  • Do not use previously frozen chicken thighs as it is not safe to refreeze the raw meat.

Monday, February 13, 2012

Chicken Breast with Ham and Mozzarella


The aroma coming from a chicken slow roasting in the oven is hard to beat. When time doesn't afford such luxury it's a good thing that the various parts can be conveniently and deliciously cooked in a much shorter period of time.

Most would agree that the economical way to buy chicken is whole unless there’s a super sale on the different parts at the grocery store.

As a newlywed, I got the part about being economical but the reality of cutting the chicken apart was very unappealing as well as frightening to me.
Until I dealt with my chicken cutting fears my father would come over to perform the necessary surgery.

I was proud of myself when I finally stepped up to the task and cut up a whole chicken on my own. It took a while though before I felt comfortable with the process and a little while longer before I actually did a good job.

There's no shortage of recipes for chicken that utilize the breast, thighs or drumsticks. Some of my chicken recipes have been passed down through the years but there are a few that have been picked up along the way.

The next few posts will be dedicated to recipes using chicken breast, thighs and drumsticks.
The remaining parts will definitely find their way into a pressure cooker making a flavourful pot of Chicken Soup.


Chicken Breast with Ham and Mozzarella


This recipe will give you the basic ingredients and method of preparation so that you can prepare as many servings as you need.

Chicken breast (boned, skinned and sliced thin)
Thinly sliced or shaved Black Forest Ham (smoked chicken or turkey may be substituted)
Thinly sliced or coarsely grated mozzarella (Swiss or any other melting cheese also works well.)
Corn oil
Butter
Salt and pepper
Flour
  1. Cut chicken breast into slices. (2 or 3 slices depending on size of breast)
  2. Pound between 2 plastic wrap sheets until thin.
  3. Dredge in flour and shake off excess. (you may season the flour with salt and pepper)
  4. Heat a small amount of corn oil and couple of tablespoons of butter in a skillet until bubbly.
  5. Lightly brown both sides of breast slice being careful not to overcook.
  6. If you didn't add salt and pepper to the flour, season chicken at this point.
  7. Remove from skillet and place on a baking sheet.
  8. Place a small amount of cheese on the chicken, add some ham then finish off with some more cheese.
  9. Bake in a preheated 375 degree oven until cheese melts and edges begin to take on a golden colour.
  10. Remove from oven and serve immediately.


Notes tips and Suggestions

  • You can prepare this earlier in the day and bake just before serving. Cook the chicken breast, cool it completely, assemble ham and cheese on top then cover and refrigerate. Remove from refrigerator just before you want to bake and serve it.
  • Leftovers make great sandwiches.

Valentine Sugar Cookies


Realizing that the years of baking these cookies for my children’s classmates were definitely over I decided to put a little twist on the original Valentine Cookie Tradition.
I baked the same cookie recipe in a much bigger Valentine shape and delivered them to “much bigger children.”

This recipe for Sugar Cookies comes from the first Cookie Book I ever owned. The dough is easy to put together, holds its cut out shape very well and are very tasty. A little dip in some melted chocolate and a sprinkle of candy hearts dresses them up for the special occasion.

I just delivered two of the remaining cookies today and the last one will be going into a “bigger person's” lunch bag tomorrow.

Time certainly has a way of changing things but I’m glad I figured out a way to hold on to my sweet Valentine tradition!


Valentine Sugar Cookies

1 ½ cups confectioner’s sugar (sift before measuring)
1 cup butter or margarine
1 egg
1 teaspoon vanilla
2 1/2 cups all purpose flour
1 teaspoon baking soda
1 teaspoon cream of tartar
  1. Preheat oven to 375 degrees F.
  2. Beat together sugar and butter.
  3. Add egg and vanilla and mix thoroughly.
  4. In a medium bowl sift together flour and baking soda.
  5. Stir flour mixture into butter mixture until well combined and forms a soft dough.
  6. Refrigerate 2 to 3 hours.
  7. Divide dough in half and roll approximately into 3/16 of an inch thick on a lightly floured pastry cloth or between 2 lightly floured sheets of wax paper.
  8. Cut with cookie cutter.
  9. Place on a lightly greased or parchment lined cookie sheet and bake 7 to 8 minutes or until delicately golden.
  10. Makes 5 dozen 2 to 2 ½ inch cookies or one dozen 5 inch hearts.
  11. When completely cooled dip part of the cookie into melted chocolate or decorate as desired.
Notes, Tips and Suggestions
  • If you have never used cream of tartar it comes in a white powder form. I once knew someone who was unfamiliar with this product and couldn’t find it since she was looking for something in a cream form. It can be purchased in the spice aisle at the grocery store or at the bulk food store.
  • If you don’t want to use chocolate after cutting out cookies sprinkle them with granulated sugar then bake. Simple but oh so good!

Cookie Cutters used for "little people."


Cookie Cutter used for "bigger people."

Thursday, February 9, 2012

Velvety Beet Cupcakes


It seems that just as we’re getting over the winter festivities Valentine’s Day shows up on the calendar. But of course who needs a calendar when the retail stores began stocking their shelves with everything Valentine’s since the second day of January.

We’ve never made a big fuss over this holiday but a yearly tradition was born when the kids began going to school. Instead of traditional Valentine’s Day cards we would bake sugar cookies in Valentine shapes and individually package and label them for each classmate.

We kept these cookies very simple, no frosting but a little red cinnamon heart would be placed strategically (as my daughter puts it) somewhere on the cookie depending on the cut out shape used.

This holiday holds more memories than sweet treats for me.

How can I ever forget the confrontation I had with a milk delivery truck on Valentine’s Day as a child.
When all was said and done, a few wiped tears and several stitches to my head made things well enough to get on with my day. My dear Uncle Mike further soothed my woes with a shiny silver dollar then took me back to school.

Upon entering the classroom I realized that the Valentine’s Day party was well under way. The treats had already been distributed so the teacher asked the students if any of them wished to share something with me.

I’m not sure if you would call it “love” but I ended up with a pile of goodies on my desk that would be hard to forget!

This week I tried a new recipe for Velvety Beet Cupcakes but gave it a few personal touches as I am usually inclined to do. The frosting recipe underwent a mini makeover as well.

Before baking these cupcakes, first think of someone that you can share them with otherwise you may end up eating them all yourself.

After baking and frosting the cupcakes I asked my son Daniel to taste test them for me and he did…until there were none left!


Velvety Beet Cupcakes

Unlike zucchini and carrots, beets are a more unfamiliar vegetable to bake with.
The beets do a great disappearing act since you won’t be able to detect their presence.

1¼ cup flour
¼ cup unsweetened cocoa powder
¾ teaspoon baking powder
¼ teaspoon baking soda
½ teaspoon salt
½ 398 ml. can beets drained and patted dry
¾ cup granulated sugar
¼ cup vegetable or corn oil
1 egg
1 teaspoon vanilla
½ cup buttermilk or soured milk

  1. Preheat oven to 350 degrees F.
  2. Line a 12-cup muffin pan with paper cups.
  3. In a large bowl sift together flour, cocoa, baking powder, baking soda and salt.
  4. In a blender puree together beets, sugar, oil, vanilla, egg and buttermilk (or soured milk) until smooth.
  5. Make a well in the center of the dry ingredients and add liquid ingredients.
  6. Beat with a mixer until well mixed being careful not to over mix. Spoon batter evenly into muffin cups.
  7. Bake for 20 to 25 minutes or until tooth pick inserted into center of cup cake comes out clean.
  8. Cool in pan on rack for 15 minutes then remove cakes to a rack to cool completely before icing.

Raspberry Cream Cheese Frosting


This Cream Cheese Frosting recipe was a great find. It’s a bit different than the more familiar recipe since whipping cream replaces the butter.
I added the raspberry puree for the pink colour but got the bonus of a truly tasty, not too sweet frosting.

¼ cup frozen raspberries (no sugar and thawed)
½ 8 ounce package cream cheese at room temperature
¼ teaspoon vanilla extract
¾ cups icing sugar
1/3 cup whipping cream (35% cream)
  • Press thawed raspberries through fine meshed sieve to remove seeds.
  • In a small bowl beat cream cheese until smooth.
  • Add vanilla and confectioners sugar and beat until smooth.
  • Add the raspberry puree and beat until well mixed.
  • Gradually add the whipping cream and whip until the frosting is thick enough to pipe.
  • Add more sugar or cream as needed to get the right consistency.
  • Pipe frosting onto completely cooled cup cakes and decorate as desired.
  • Refrigerate.

Notes, Tips and Suggestions

  • To sour milk place 1 teaspoon white vinegar in the bottom of measuring cup and add enough milk to measure ½ cup.
  • Don’t overfill cups with batter, you don't want muffin tops on your cupcakes.
  • I used frozen raspberries but fresh ones will probably work as well.

Wednesday, February 1, 2012

Chocolate Banana Cake


After immigrating to Canada our family lived in small rental flats until my parents saved enough money to put a down payment on our first house. The corner lot, two bedroom bungalow they purchased was bordered by short hedges and a white picket fence. This house was a mansion compared to previous accommodations.

Many years later I revisited the area and drove past the house. It certainly didn’t look as big as I remembered it from my childhood days and I wondered how our family of eventually four kids was able to live there. I must mention that my uncle and grandmother also lived with us there for several years.

My mind holds so many memories of those days and that house where we did most of our growing up. My sister and I quickly made friends and memories with the girls next door but my fondest memories by far are those of their mother, Mrs. Audrey Black.

Mrs. Black was a remarkable woman. As a child I admired her and as an adult I totally respect her memory. Her kindness and generosity spilled over into our lives as she regularly included us in many of her family outings.

How distinctly I remember one particular day when she took my sister and me to a special church event.
She had baked something to take that day and as she uncovered and placed it on the table I was simply awestruck! It was the most beautiful cake I had ever seen.

It towered over everything else on the table. Soft white icing swirled over the entire cake and what seemed to be a fresh snowfall of coconut covered the cake so delicately.
I still remember and will probably never forget the exact words that came to my mind that day. “One day I will make a cake just like that!”

I’ve made countless cakes over the years but have been especially fond of very tall cakes. It may very well be that Mrs. Black inspired my love of baking.

Although I usually bake from scratch, some recipes using mixes are too good to ignore when they produce such delicious results.

This Chocolate Banana Cake definitely qualifies as one of those recipes and unless someone asks for the recipe they need not know that it is made from a mix.
I’ve baked this cake in a Bundt pan with absolutely delicious results but it really does make a beautiful “very tall cake”.


Chocolate Banana Cake

1 package (2-layer size) chocolate cake mix
3 eggs
1 cup mashed fully ripe bananas (about 3)
1 cup sour cream
¼ cup vegetable or corn oil
  1. Preheat oven to 350 degrees F.
  2. Place cake mix in a medium bowl, make a well in the center and add the oil, eggs, sour cream and mashed banana.
  3. Beat with mixer until ingredients are well combined.
  4. Pour into 3 greased and floured 8 inch round cake pans
  5. Bake for 30 to 35 minutes or until toothpick inserted in center comes out clean.
  6. Let rest in pans 5 minutes then remove from pans and cool completely on wire racks.
  7. Fill and frost with favourite frosting or use Banana Cream Frosting (recipe follows).
Banana Cream Frosting

1 package Jello instant Banana Pudding
1 cup milk
1 ½ cups whipping cream (35% cream)
  1. Place all ingredients in a medium bowl and beat with electric mixer until very thick.
  2. Makes enough frosting to fill 2 layers and frost cake.


Notes, Tips and Suggestions
  • This recipe can be made in a Bundt Pan and baked for 50 to 55 minutes or until toothpick inserted in center comes out clean.
  • Bananas must be very ripe for best results. The worse they look the better they will work.
  • Very ripe bananas freeze well. Place unpeeled bananas in a plastic bag and store in the freezer. Defrost, peel and use as needed.
  • Try sifting cake mix before using to get rid of any lumps. Doing this also cuts down on beating time which produces a more tender cake.
  • After greasing pans, line the bottom with a round piece of parchment paper. This makes getting the cake out of the pan much easier and in one piece.
  • After frosting, coat sides of cake with finely chopped walnuts or grated chocolate.
  • This cake mellows with age, make at least the day ahead for a delicious, moist cake.
  • Store covered.