Sunday, January 22, 2012

Torta di Ricotta


There must be a million cheese cake recipes just waiting to be made each one boasting a special ingredient making it unique and promising to be the best one ever.

Each new cheese cake recipe that looks interesting joins my recipe to try out file. There's actually a file folder entirely devoted to cheese cakes.

There is however one cheesecake I often make that has come a long way from very humble beginnings. There are many versions of this recipe that have most likely been passed down from generation to generation but this recipe holds sweet memories for me.

Torta di Ricotta is the Italian version of the well loved cheesecake and is a little different than the traditional cream cheese version.

Even though I was quite young at the time, I vividly remember my first encounter with this Italian delicacy. It was a time in our lives when everything was very family oriented and everyone showed up for every life event, big or small.

The elderly mother of my Aunt Caterina was visiting from the old country one summer and as usual anyone available showed up at the airport to give her a warm welcome.

As she approached us from the arrival gate we noticed a little white bundle in her hands and she was holding on to it as if it was her most precious possession.
It was wrapped in a white cloth napkin, the ends drawn up the sides and tied in a tidy little knot in the center.

At the reveal we found out that it was a ricotta cheesecake still in the little pan that it was baked. It was made from three simple ingredients, ricotta, eggs and sugar. She must have held on to it throughout the whole flight.

I remember my mother occasionally making this type of cheesecake for us but she added some orange and lemon zest and a crust. The citrus zest was an improvement but the crust as I remember it did not leave me with fond memories.

I eventually tried my hand at baking this cheesecake knowing only the basic ingredients but no exact measurements. So what else is new?

Now here is a recipe that I intentionally made changes to until I ended up with satisfying results and wins the approval of most who try it.

The addition of a few new ingredients, a flaky crust and a few changes in the method of preparation has helped this cheesecake come a long way from the one in that sweet little white bundle.

Torta di Ricotta (Italian Cheese Cake)

Filling
2 containers of smooth ricotta (a total of 800 to 900 grams)
3 large eggs
¾ cup granulated sugar
¼ cup flour
½ cup mini chocolate chips
¼ cup finely chopped maraschino cherries (well drained)
Finely grated zest from one lemon and one orange
  1. Place ricotta in a bowl and beat until smooth with mixer.
  2. In a separate bowl beat the eggs until frothy, gradually add sugar and continue beating until light and fluffy.
  3. Add egg mixture to cheese mixture and beat together with mixer until well blended, add flour continue mixing until smooth.
  4. Stir in orange and lemon zest, chocolate chips and maraschino cherries.
  5. Make a shortening crust as in my post for Apple Pie.
  6. Cut off 1/3 of the dough and reserve for lattice on top of cake.
  7. Roll remaining dough until large enough to fit into a square 8 or 9 inch baking dish.
  8. Add prepared cheese filling.
  9. Roll remaining dough, cut into strips and place like a lattice over cheese filling.
  10. Sprinkle top generously with granulated sugar.
  11. Bake at 400 degrees F. until light golden brown, about 45 minutes.
  12. Turn oven off, leave door ajar and leave cake in the oven for about 20 minutes.
  13. Remove from oven and cool completely on wire rack.
  14. Refrigerate, when cold cut into small squares (20 to 24 squares)
  15. Store in refrigerator.


Notes, Tips and Suggestions
  • It’s a good idea to drain the ricotta in a small colander overnight or at least a few hours to remove excess moisture.
  • Ricotta can usually be purchased in 400 or 450 gram tubs. Total amount used can be between 800 and 900 grams
  • Making sure cheesecake is cold before cutting ensures neat clean results
A Time Saver
To the best of my knowledge this tool is called a pastry wheel.


I've used it for so many years until....


They call it a Pasta Bike. I'm not sure why it is called so but besides cutting pasta dough into fancy noodles and lasagna strips or cutting uniform squares for ravioli and cappelletti it makes cutting lattice pastry strips a breeze! The removal of some of the wheels will cut strips into the preferred width.

Wednesday, January 18, 2012

Apple Bran Muffins


Even though recipes come from many sources these days there’s nothing I like better than to get acquainted with a new cookbook full of colourful pictures.

When I detect a new recipe that seems to have good potential in goes a bookmark with the intention of trying it out the first chance I get.

Before moving, I managed to go through my large magazine collection and removed any interesting recipes that were hiding between the advertisements.

Of course these went directly into my recipes to try out file which takes considerably less space than magazines but seriously expands the file.

Many of my favourite recipes are still followed exactly how I first came across them. However, some recipes have gone through a makeover, most of them intentional but some quite unintentional.

I don’t remember where this recipe for Apple Bran Muffins came from. I remember looking for a good bran muffin recipe for some time and the search came to an end at the discovery of this one. It wasn’t exactly what I was looking for but it was better than other recipes I had tried.

I suppose it really doesn’t matter where the recipe originally came from because quite unintentionally it underwent somewhat of a makeover and evolved into a different recipe.

A while back I was baking a batch of these muffins and inadvertently forgot to add the one cup of brown sugar called for in the recipe.

As I slid the muffin pan into the oven I noticed a cup of firmly packed brown sugar sitting on the kitchen counter looking right back at me. I was immediately struck with a double disappointment. First, the waste of perfectly good ingredients and then no muffins for breakfast the next morning.

I don’t know why I continued to bake the muffins at that point but the results caught me totally by surprise. Even with the total omission of sugar they were amazingly good. Perhaps the three tablespoons of molasses was all the sweetening these muffins needed. After a few trial runs the addition of a quarter cup of brown sugar gave the best results.

On another occasion I was in a hurry while baking this same recipe and decided to take a few shortcuts. Instead of melting the butter called for in the recipe I used corn oil and coarsely grated the apple instead of finely chopping it.

I am quite satisfied with these changes as they have cut down on preparation time, fat and sugar but can't promise that there will not be any further changes in the future.

The best part of this muffin makeover is the sight of beautiful muffin tops which were non existent when the full amount of sugar was used.

Now, everyone knows that every good muffin needs a beautiful muffin top!

Apple Bran Muffins

1/4 cup packed brown sugar
1 egg
1 cup soured milk (see notes, tips and suggestions)
6 tablespoons corn or canola oil
3 tablespoons molasses
1½ cups natural wheat bran
1 cup all purpose flour
1 teaspoon baking soda
½ teaspoon baking powder
½ teaspoon salt
1 cup coarsely grated peeled apple (about 2 medium apples)
¾ cup raisins (optional)

  1. Preheat oven to 400 degrees F.
  2. Combine brown sugar, egg, soured milk, oil, molasses and wheat bran and set aside.
  3. Peel and grate apples.
  4. Sift together flour, baking soda, baking powder and salt into a medium bowl and make a well in the center.
  5. Add the wet ingredients and quickly stir mixing well.
  6. Stir in the apple and raisins if using. (avoid over mixing)
  7. Spoon batter into prepared muffin pan (greased muffin wells or use paper liners.)
  8. Bake for 17 to 23 minutes or until top springs back when lightly touched.
  9. Remove from pan and place on cooling racks.
  10. Makes 8 large muffins.


Notes, Tips and Suggestions
  • Sour the milk by placing 1 tablespoon white vinegar in the bottom of measuring cup then add enough milk to measure one cup.
  • one cup of buttermilk can replace the soured milk.
  • Measure out the oil first then when the molasses is measured it will slip out of the measuring spoon with ease.
  • These muffins freeze very well.
  • This post may dredge up some painful feelings of sabotage for some people. Please note that any omissions or errors in my recipes are purely accidental in nature and I do sincerely apologize:)

Wednesday, January 11, 2012

Stuffed Squid and Potato Casserole


Unless one has been exposed to eating the more interesting kinds of fish from an early age there will definitely need to be an adjustment in the way they see things.
As children, we were always being introduced to strange and interesting species from the deep since my parents were from a part of Italy that bordered on the Mediterranean Sea and fresh fish was a daily norm.
As kids, we had never heard of sushi but thinking back on those days I suppose eating raw octopus, squid and cuttlefish may have given us a similar experience.
Mind you, the ones eaten raw were especially chosen to be eaten that way since they were most tender and delicious.
During one of my high school years I presented a project on the octopus to my class and my father generously procured a sizable specimen for me to exhibit.
Off to school I went with an eight legged mollusk stuffed in a glass jar.
Things went very well except for the few students whose faces took on a shade of green as I pulled the wet slimy creature from the jar.
If they could only know that after its debut it was headed straight for a steaming pot and then to our dinner table that evening.
I don’t think I could ever be as courageous today as I was back then. However, I do take courage in the kitchen and prepare the fish dishes that I’ve watched my mother prepare for years.
Courage may not be needed if cleaned fish is purchased as in the cleaned squid I used to cook for this post. The purchase of uncleaned squid and having to clean it is a different story which I will perhaps leave as material for another post.
Stuffed squid with potatoes is another comfort food that warms the room before it warms the stomach.
When served, it’s hard to believe that there was ever anything in the plate since every last drop is usually mopped up with a piece of fresh crusty bread.

Stuffed Squid and Potato Casserole
The ingredients are not in exact measurements. The amount of filling required depends on the number of squid to be filled. A larger quantity potatoes used will require more layers to be made.
Egg and Bread Stuffing
For every slice of soft bread used you will need:
1 egg
About ¼ cup grated cheese
Salt and pepper to taste
1 to 2 teaspoons chopped Italian parsley
  1. Coarsely grate bread (freezing slice for a few minutes makes grating easier or use a food processor)
  2. Beat the egg well then mix in remaining ingredients.
  3. Allow mixture to rest a few minutes until moisture is absorbed, set aside.
  4. Makes approximately 3/4 cups of stuffing.


Preparing the Squid

  1. Defrost and remove squid from packaging.
  2. Rinse in a bowl of cold, salted water.
  3. Drain well, pat with a paper towel to remove excess moisture.
  4. Cut off portion of squid above the tentacles and discard.
  5. Fill the squid tube with stuffing, (pastry bag and plain tip makes it easier.)
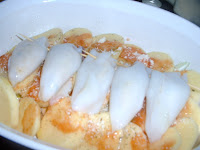
  6. Place tentacles in the tube opening as shown on picture and secure with a toothpick.
  7. Set aside.
Preparing the Casserole
potatoes (depends on number of servings you wish to make)
olive oil and tomato sauce (enough to drizzle on each layer)
onion (one medium size)
garlic ( approximately 2 cloves)
oregano, salt and pepper (to taste)
Finely chopped Italian parsley and grated cheese (enough to sprinkle on each layer)
  1. Peel potatoes and thickly slice. (about 1/2 inch thick)
  2. Chop onion and garlic and place in bottom of pan.
  3. Drizzle in a small amount of olive oil and tomato sauce.
  4. Sprinkle in some salt, pepper, oregano and cheese and parsley.
  5. Place a layer of sliced potatoes.
  6. Repeat with oil, tomato sauce, salt, pepper, cheese oregano and parsley alternating layers of potatoes and seasonings until all of the potatoes are used up.
  7. Place stuffed squid on top of potato layer and season again.
  8. At this point you can put a layer of potatoes over the squid. This will prevent them from drying out while baking.
  9. Season top layer well.
  10. Add about 1/2 to 3/4 cup water to pan which makes some sauce to dip bread in.
  11. Cover and bake for 1¼ to 1½ hours at 375 degrees F. or until potatoes are fork tender.
  12. If you prefer crispy potatoes on top remove lid in the last 20 minutes of baking.
  13. Remove from oven and let rest covered for about 20 minutes before serving.
Notes, Tips and Suggestions
  • Preparing this dish may seem like a lengthy process but it took me longer to prepare this post than to make, cook the meal, eat it and clean up.
  • The first time I made this there was no written recipe (no surprise here.) Just by knowing the basic ingredients and asking a few (maybe more than a few) questions I was able to put the dish together.
  • After making it a few times you will become more familiar with the ingredients and be able to adjust the amounts and seasonings to your liking.
  • Cleaned, large squid tubes can be used instead of small, this will cut down on preparation time.
  • If large squid tubes are used, after cooking them cut into slices to serve.
  • Do not overfill the squid with stuffing since they tend to burst. Still good to eat but not as presentable.
  • For the tomato sauce, I usually puree some canned plum tomatoes and strain out the seeds before using.
  • No time or patience for stuffing the squid? Slice empty squid tubes and alternate layers of squid and potatoes following the original recipe.
  • Squeamish about tentacles? Squid tubes can be purchased minus the tentacles for the less adventurous.

Friday, January 6, 2012

Someone's In Another Kitchen


I am finally restarting my blog from a new kitchen.
It’s taking a while to get use to my new little domain and admit to occasionally opening the wrong drawer or cupboard to reach for ingredients and cooking tools.
I should be a little easier on myself since I ruled in my former kitchen for thirty seven years and basically could get around with my eyes closed.
Do I miss it? Certainly! My new kitchen is larger, newer and very friendly but my old kitchen holds memories of special dinners, birthday cakes, cookies, desserts of all kinds and family growing up around the table.
Again I say that food experiences make some of the best memories.
I was reminded of this when making our favourite Cinnamon Rolls for the first time in the new kitchen.
While making them I became so overwhelmed with emotion and at first couldn’t figure out why.
Suddenly, a flood of memories inundated my mind. Saturday mornings and leisurely breakfasts with the kids, memories of who would get that middle roll, sticky fingers and sleepovers where cinnamon rolls were appreciated and enjoyed.
I finally pulled myself together and assured myself that as wonderful as those memories are this kitchen holds many memories yet to be made and it was time to get started.
In a short while the kitchen was filled with the sweet aroma of cinnamon and yeast bread soothing that longing for wonderful years gone by.
After purchasing our new home I remarked to the previous owners how much I liked the sign that hung over the kitchen walkout doors.
When we finally moved in I was surprised and very happy to see that the sign had been left behind.
It regularly reminds me that although the house that I enjoyed living in for so many years would not be my forever home, my family and all the memories of the wonderful times we enjoyed there were not a part of the sale.

Thursday, January 5, 2012

Lentil Soup


Well the holidays are over along with all the good reasons to indulge in seasonal cookies, cakes and any other festive delicacies.
It’s time to forgive ourselves and fill the pot with some nutritious ingredients as we enter the New Year.
This time of year along with the cold weather and snowy days calls for cooking some serious comfort food.
As a child I don’t think I really came to appreciate the legume family of foods.
Beans, chick peas and lentils took a turn showing up at our table each week.
Fava beans occasionally made a guest appearance and were usually served with dandelion greens.
The beans, chick peas and lentils were mostly served mixed with rice or spaghetti which had been snapped into small pieces before cooking.
I don’t think we realized how well we were eating. We ate because we didn’t have a choice and most times were glad that legume day was over for the week.
My children weren’t much different when it came to eating this kind of meal.
Some would eat the meal under protest and others would gag at the very idea of having to lift the spoon to their mouth.
In such cases I would eventually give in and prepare them a plate of pasta tossed with butter and cheese.
It has come to my attention though that some of these persons have since acquired a taste for lentils, chick peas and such and are actually enjoying them.
Today was one of those wintry, snowy days and I put a pot of lentils on the stove.
I prepared them just as my mother still does and probably as her mother did before her.
I stood a while behind the window in the kitchen and watched the snow gently falling as I enjoyed the earthy fragrance that filled the room.


Lentil Soup

2 cups brown lentils
6 cups cold water
2 to 3 cloves of garlic (peeled)
1 stalk of celery
2 to 3 bay leaves
1 small tomato (seeds removed)
1/3 cup extra virgin olive oil
salt and pepper to taste
  1. Place lentils in a good size pot that will allow them to expand while cooking
  2. Thoroughly wash lentils under cold water removing any debris that may be hiding there.
  3. Drain then fill the pot with the cold water for cooking.
  4. Add bay leaves, garlic, celery, tomato, olive oil, salt and pepper.
  5. Place on stove on high heat and bring to a boil.
  6. Let boil for 5 minutes then reduce heat to a simmer.
  7. Simmer, partially covering the pot with the lid so to let the steam escape.
  8. Cook for approximately 40 to 50 minutes or until tender.
  9. Remove cooked celery, tomato, garlic and bay leaves before serving.


Notes Tips and Suggestions
  • Make sure you pick over the lentils well as there have been times that small little pebbles have camouflaged themselves as the real thing.
  • The instructions on my lentil package claim that they will cook in 20 minutes...I don't think so.
  • After the lentils are cooked and tender it's a good idea to let them rest a while until some of the juice is absorbed.
  • It's optional to throw in a tomato. I couldn't figure out why my mother always did. A while back I read that the acid in the tomato helps tenderize legumes. (squeeze out the seeds first)
  • Just before serving add just a splash of extra virgin olive oil to the lentils...it goes a long way.
  • Opening a can of precooked lentils may save time and effort but lack that home cooked taste.
  • If time is not on your side cook them the day before you want to eat them. Once you have assembled all of the ingredients, the stove will do the rest.