Friday, September 25, 2009

Marinara Sauce


Marinara is an Italian seafood sauce that takes its name from the Italian word "marinaio" meaning sailor. This sauce is traditionally made with garlic and herbs that makes it perfect for the addition of seafood.

When made with fish it’s usually served over linguine, spaghetti or capellini pasta as well as rice.

A modern marinara is a light vegetarian sauce of tomato, onion, garlic, basil and oregano and is often used on pasta and also meat dishes like veal parmigiano.

This sauce can also be used in pasta dishes where vegetables such as green beans or broccoli have been added.

Store bought pasta is basically made from the same ingredients and differ only in shapes and sizes. However if you were brought up in a traditional Italian home you were taught which pasta shape and size complimented which type of sauce…no exceptions and no questions if you please.

For the most part I have to agree with this pasta/sauce rule that has probably stood for centuries but I find a simple tasty Marinara Sauce compliments any shape and size of pasta.

Because there is no meat added to this sauce the cooking time is shorter. If adding fish to the sauce, it can be added a few minutes before it's ready to prevent overcooking the fish.


Clams in Marinara Sauce

4 to 5 cups tomato sauce ( puree)
2 to 3 cloves of garlic
splash of oil (I prefer corn oil)
salt and pepper to taste
basil (fresh or dry)
fresh parsley
12 to 15 Cherrystone Clams
  1. Heat oil in pan
  2. Crush or finely mince garlic add to hot oil and saute until golden.
  3. Add tomato puree, salt, pepper, parsley and dry basil if using and bring up to a boil.
  4. Lower heat and simmer for 30 to 35 minutes
  5. If using fresh basil add it just a few minutes before end of cooking time to preserve its flavour.
  6. Add the clams and when they open the sauce is ready.


Notes, Tips and Suggestions

  • Be careful not to burn the garlic as it becomes very bitter and gives the sauce a bitter taste. If by chance you burn it, throw it out and start over.
  • I have used marinara sauce, mozzarella and grated parmigiano cheese to layer between lasagna noodles. After baking, plate the lasagna and crown each serving with sautéed shrimp then a generous amount of MarinaraSauce over the shrimp. This makes a great seafood lasagna.
  • When adding fish to the Marinara Sauce add at the very end of cooking. Most fish takes very little time to cook and remember that even if you turn off the heat and remove it from the burner the heat of the sauce will continue to cook the fish.
  • If adding shellfish, make sure to scrub the shells before using. In the case of clams soak them overnight in salted water to remove any sand particles that may be inside. Drain well and add to the sauce.
  • Little Neck, also known as Sauce Clams are also a good choice.

The Art of Pressing and Rolling


Fresh garlic can be sliced, crushed and minced but if you prefer to experience only the taste and not the texture I found the garlic press to do the best job.

The garlic press also helps better release the natural oils and flavour of the garlic.

From experience I’ve found that the press with little teeth that crush the garlic through small holes doesn’t last very long.

If the teeth do not directly align themselves into the holes, repeated use causes damage to the press.

The press with small holes and a flat plate that presses the garlic through works best and wears well also.

Fresh garlic is hard to peel especially if you’re in a hurry. Placing a few cloves into the rubber cylinder and a quick roll with your hand does a quick and neat job of peeling the garlic.

Both tools are rather inexpensive to buy and make the preparation of garlic an easy task.


Friday, September 18, 2009

Tomato Meat Sauce


It remains a mystery how the same ingredients can be used to make a traditional tomato sauce yet result in such a distinctive taste difference when made by individual cooks.

I learned to make a traditional meat sauce from my mother who no doubt learned to make it from her mother. Our sauces, though both very tasty have never tasted the same.

Perhaps it’s because again there’s no exact measurement of ingredients. The main ingredients are basic in each individual recipe but the addition of spices, oils, garlic, onion and various meats are at the cook’s discretion. Cooking time and method of preparation could also be a contributing factor.

Recipes that have been passed down through the generations have a tendency to evolve into an individual’s signature recipe.

In the Italian culture Sunday pasta with a good meat sauce also known as ragu, has been traditional fare for generations.

No one ever had to ask what was for dinner on a Sunday. There was never a worry on what to prepare and no one ever complained that it was pasta and sauce…again.

Since Sunday mornings were always a busy time getting ready for church the meat sauce was prepared the day before.

Upon returning home, we warmed up the sauce, cooked the pasta, tossed the salad and sat down to a good family dinner.

I naturally adopted this tradition for my own family and we have enjoyed many years of Sunday pasta and sauce.

Even though most of the kids have moved away this tradition lives on as they return each week for Sunday dinner. It remains to be seen if this tradition will last another generation or become history.

I’m passing my basic recipe for Tomato Meat Sauce on to you but am positive that it won’t taste like mine!


Tomato Meat Sauce

8 to 10 cups tomato sauce (puree)
favourite cut of meat (pork back ribs, veal roll ups, meatballs, Italian sausage etc.) plus small amount of oil for browning
6 tablespoons vegetable oil (for sauce)
salt and pepper to taste
½ teaspoon dried basil (optional)
(if using fresh basil add to pot in the last few minutes of cooking)
1 medium finely chopped cooking onion
  1. Heat a small amount of oil in a skillet, add meat and evenly brown then set aside.
  2. In a large saucepan sauté onion in the 6 tablespoons of oil until softened, add tomato sauce, salt and pepper and bring up to a boil.
  3. Add the browned meat, bring up to a boil again then reduce heat and simmer for approximately 45 to 55 minutes until meat is cooked and sauce thickens.


Notes, Tips and Suggestions

  • This recipe serves about 8 people but it can be halved or doubled.
  • If adding meatballs to the sauce browning is optional. I add them without browning.
  • For those who dislike finding pieces of onion in the sauce (like my kids) coarsely grating the onion instead of chopping will ensure it blends right into the sauce.
  • Some traditional sauce recipes instruct you to cook the sauce to death (hours and hours). I believe that once the meat is cooked it’s ready and the sauce retains a fresh tomato taste.
  • In my opinion overcooking destroys a lot of taste and leaves you with more of a tomato paste than a sauce.
  • If the sauce is not to be used the same day cool it down quickly by placing the pot in a sink filled with cold water then refrigerate. This helps preserve the flavour and keeps the food safe for eating.

A Special “Meating” of Ingredients


Almost everyone likes meatballs. The right combination of meat and a few other flavourful ingredients makes for a tender, tasty addition to any tomato sauce.

The mystery continues concerning meatballs as with recipes for tomato sauce.
Somehow each traditional recipe is as unique as the person making them.

I’ve included the recipe that I use although up to this point I have never made them with exact measurements. Measurements have been added as a guideline only so feel free to experiment and come up with your own recipe

Meatballs

1 pound each of medium ground veal and pork or 2 pounds of either meat
( a combination of any favourite ground meat can be used)
½ cup finely grated Parmigiano, Romano or Crotonese cheese
2 eggs (well beaten)
1/3 cup dry bread crumbs
salt and pepper to taste
3 tablespoons chopped fresh Italian parsley
  1. Place all ingredients in a large bowl and with hands mix them together thoroughly.
  2. Don’t handle too much or meatballs will be tough.
  3. Spoon or scoop out enough mixture to make a medium size meatball.
  4. Roll mixture with palms of hands to form a round ball.
  5. Makes approximately 25 meatballs depending on size made.
  6. If fresh not previously frozen meat is used these freeze very well.
  7. Place them on a baking sheet lined with plastic wrap, cover with another sheet of wrap and freeze until solid.
  8. Transfer into a zip lock bag and store in freezer until ready to use.
  9. These can be thawed, browned and added to the sauce as above or added directly to the sauce in the frozen state without browning.
Meatballs accompany many pasta dishes but they do make some good meatball submarine sandwiches.
A bowl of meatballs in a pool of rich tomato sauce accompanied by a fresh ciabatta loaf or garlic bread makes for a great dipping experience!


Veal or Beef Braciole
(Roulades or Roll Ups)


thin slices of beef round or veal scaloppini
thinly sliced prosciutto cotto or pancetta
fresh finely chopped parsley
grated Parmigiano or Romano cheese
finely minced garlic (optional)
salt and pepper to taste
  1. Lay meat on a flat surface, fill with remaining ingredients and roll up tightly.
  2. Place meat onto a piece of plastic wrap and roll up tightly.
  3. Take both ends of the plastic wrap and in a forward motion spin until meat roll takes n a cylindrical shape.
  4. Unroll plastic wrap and insert 2 to 3 toothpicks to secure.
  5. Brown in a small amount of vegetable oil and add to the sauce.
  6. Remove toothpicks before serving.


Monday, September 14, 2009

Homemade Tomato Sauce


Autumn is my favourite time of year. The sights, sounds and smells of the season bring back many wonderful memories especially those of harvest time.

I have many memories of my mother hard at work preserving tomatoes, eggplant and peppers among other vegetables and fruit harvested in the fall.

During this season it wasn’t an uncommon sight to see up to fifteen bushels of perfectly ripened tomatoes lined up on the garage floor. A few bushels of deep purple eggplant and brightly coloured peppers contrasted the sea of bright red tomatoes.

Of course this sight always meant a lot of work but the fruit of our labour was captured in rows of jars and bottles that filled the shelves of our cool cellar or better known as the pantry.

The coming winter never looked so good!

Making a year supply of tomato sauce has always been a family affair and my own family has been able to continue the tradition. Even the kids have designated duties on tomato sauce day. However, as they get older, there is always some good reason why they can't be present to help.

But each year we always manage to conscript at least a few family members which always lightens the load and definitely increases the fun.

The whole process requires some organization, a full days work and a few days of putting everything back in order.

Having the right tools and the ingenuity to invent the tools you lack goes a long way and the word improvisation takes on a whole new meaning.

But somehow at the end of the day when the last jar has been filled and all those once full bushels remain empty, you realize that the day has not just been about preserving tomatoes.

Just as important if not more is the fact that a long standing tradition has been preserved yet another year!

Below, I have included the method of making fresh tomato sauce on a much smaller scale. This can be accomplished in your kitchen with a few simple tools.

What you actually end up with is a wonderful tomato puree that can be used to make tasty tomato sauces by the addition of spices, herbs and even meat or fish.

In my next post I’ll be sure to include some simple sauce recipes that we’ve enjoyed for longer than I can remember.

Fresh Tomato Sauce

In-season tomatoes (Roma or San Marzano)
Fresh parsley and basil (optional)
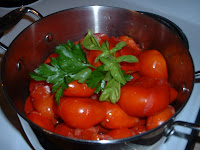
  1. Wash tomatoes, cut or squash each one with your hand shaking out any seeds.
  2. Place in a large pot and add parsley and basil if using.
  3. Cook on medium heat until softened
  4. Cool then drain any liquid that the tomatoes have rendered.
  5. In small batches process through a food mill to make a rich sauce.
Notes, Tips and Suggestions
  • Make sure your tomatoes are at their ripest for the best results.
  • If you don’t own a food mill use a blender instead.
  • Cook and cool the tomatoes as above. At this point you may remove the peels, however, leaving the skins on will give the sauce a thicker consistency.
  • Strain sauce through a fine mesh sieve to remove any remaining seeds and traces of peel.


Through the Mill

The food mill is a very useful kitchen tool. Besides using it to make tomato sauce, I’ve used it to make baby food from peaches, pears and apples.

I still like making the applesauce. While the mill removes the apple peels and seeds the sauce takes on an attractive pink blush.

It usually comes with three interchangeable disks that give you a choice of desired texture anything from fine, medium to coarse.

I personally haven’t tried it myself but have it on good authority that the mill doubles as a ricer for potatoes.

If you don’t happen to own either tool this information may help you decide which one is more practical to own.

Friday, September 4, 2009

Twice Baked Potatoes


Just can’t seem to get potatoes off my mind. I think I could come up with a different potato recipe for each day of the year.

It seems that potatoes get along very well with any kind of meat and fish as well as other vegetables. They don’t do too badly on their own either.

While deciding what dish to prepare for my last potato post it became clear that it had to be something simple, tasty and appealing to the eye. The twice baked potato fits all the requirements mentioned above which made the choice very easy.

This recipe is basic but the possibilities are multiplied by individual tastes and creative ideas.

You can basically add almost any flavour that you please to this recipe, fresh or dried herbs, caramelized onions or different varieties of cheese make it a new taste experience every time you make them.
The addition of cooked ham or bacon makes for an interesting variation.

Twice baked potatoes can be made hours ahead, refrigerated then popped into the oven just before serving. Family and guests alike have always appreciated the royal treatment when one of these creations met their plate.

Twice Baked Potatoes


4 medium size baking potatoes
1 beaten egg (optional)
1/3 cup warm milk (approximately)
salt and pepper to taste
favourite cheese, shredded (optional)
finely chopped fresh herbs like parsley, rosemary etc. (optional)
dry bread crumbs (season if desired)
  1. Wash and dry then rub each potato with vegetable oil. Wrap in foil and bake until tender (approximately 1 hour)
  2. While still hot cut a thin slice off the top.
  3. Scoop out the potato into a bowl being careful not to break through the skin leaving 1/4 inch of potato all around.
  4. Mash or rice potato scooped out potato and season with salt, pepper and herbs of using. Start beating with electric beater while gradually adding warm milk then add beaten egg if using.
  5. Beat until everything is well mixed and the potatoes are light and fluffy, potatoes should be thick not runny.
  6. Use a spoon or pastry bag to fill the potato skins with the mixture.
  7. Place potatoes in a pan and sprinkle with dry bread crumbs.
  8. Bake in a 375 degree oven until golden and crisp, approximately 20 minutes.
  9. Serve hot.
Notes, Tips and Suggestions
  • If using potatoes with fresh unblemished skin the entire potato is edible. If the skin is tough it will serve as a little bowl, in this case eat only the inside mixture.
  • Make sure to only use warm milk, cold milk will turn the potatoes into glue.
  • If using cheese, it can be mixed right into the potato mixture or fill potato skins half full, place some cheese in the center then cover with more potato mixture. This will give you a soft cheesy center after baking.
  • If egg is omitted increase quantity of milk to about 1/2 cup. Liquid amount may vary depending on the size and dryness of the potatoes, add the milk gradually until right consistency is obtained.


Some Piercing News


You can cut down on the initial baking time of the potato by using stainless steel skewers.
After washing and drying potatoes, pierce the potatoes lengthwise onto the skewers, as many as will fit. Then rub them with the oil, wrap in foil and bake as usual. The skewer gets hot and begins cooking the potato from the inside.