Wednesday, August 26, 2009

Potato Gnocchi


Potatoes do find their way into many interesting and tasty dishes and sometimes without getting any recognition or fame they remain incognito.

Unless Potato Gnocchi is homemade or ordered from a restaurant menu, one may not recognize the star ingredient.

Among the many ways Potato Gnocchi are presented they’re often served smothered in a wonderful tomato sauce or tossed in a zesty pesto with plenty of grated cheese. The gnocchi become the little vehicles that carry whatever flavours you may desire.

The various regions of Italy have their own version of the perfect gnocchi. They are made with anything ranging from potatoes, cornmeal, buckwheat, squash, spinach or ricotta cheese. In the more northern regions they are even made with rye bread crumbs.

Other than using potatoes I have also made them with ricotta cheese. These are lighter and less starchy while the potato gnocchi tend to be wonderfully dense and chewy and of course contain more starch.

I have a recipe for squash gnocchi that is patiently waiting in my “Recipes to Try out File.” It’s been there for sometime as I am not particularly fond of squash.

One day soon I hope to be brave enough to try the recipe and decide whether it needs to graduate into the “Tested and True” collection or find its way into another file like “Tested and Trashed.”

I’ve made gnocchi using three different tools. Some may prefer to make gnocchi by rolling strands of dough then cutting or pinching off small pieces of the dough. I prefer the shape of hollow ridged shells.

My first gnocchi were made on a rustic hand made basket that came from Calabria my husband’s hometown in Italy. While on vacation my sister brought back a wooden gnocchi paddle from Alberobello, Italy for me and I also bought a machine that cranks them out by the dozens.

My favourite tool by far is the gnocchi paddle and a fork. When no one else is around I love to sit at the kitchen table, let my mind wander and individually shape each little gnocchi by hand.

Before I know it I’ve made hundreds of little treasures ready to be served for dinner.

Potato Gnocchi

3 medium size potatoes (about 1 pound)
1 ¾ cups all purpose flour
  1. Wash, peel and cut potatoes into quarters.
  2. Cook in salted water until tender (about 20 minutes)
  3. Drain water and shake pan over low heat to dry potatoes off.
  4. Mash or rice potatoes and keep warm.
  5. Measure flour onto a bowl and make a well in the center of the flour.
  6. Add hot mashed potatoes to flour and mix well.
  7. Turn dough out onto a floured surface and knead until smooth and elastic.
  8. Roll out dough to about ¾ inch thickness, cut into ¾ inch wide strips.
  9. With hands roll each strip just to make them cylindrical.
  10. With fingers pinch off 1 inch pieces of dough, place on gnocchi paddle and curl each piece by pressing a fork on the piece of dough and pulling the fork towards you.
  11. Lay the gnocchi on a baking sheet that has been lined with a clean tea towel.
  12. Place pan in freezer until gnocchi are firm then place in freezer bags and store in freezer until ready to use
  13. To cook, bring a large pot of salted water to a boil. Add the gnocchi and stir to make sure they don’t stick.
  14. When gnocchi rise to the top they’re ready, scoop out with a slotted spoon.
  15. Drain well and add your favourite sauce. Makes 4 servings.

Notes, Tips and Suggestions
  • Even when you want to serve the gnocchi the same day freeze them while still on the tray. This makes them easier to handle and they’re less likely to stick together when you cook them.
  • Make sure the potatoes are hot when you mix them to the flour, use a rubber spatula at the beginning so you don’t burn your hands.
  • Dough will be a little sticky but try to use as little extra flour as possible. This will ensure the gnocchi remain tender.
  • Finely chop your favourite herb and add to the gnocchi dough before shaping for extra flavour.


Tools of the Trade

The basket did a great job making the gnocchi but it was wearing out so I was glad to replace it with the wooden paddle.

As mentioned, the paddle I use was purchased in Italy but I was also able to find one at Golda’s Kitchen in Mississauga Ontario.

The machine makes gnocchi as well as cavatelli pasta. I occasionally use the machine but there’s just something so satisfying about making the gnocchi by hand.


Tuesday, August 18, 2009

Potato Croquettes


Occasionally my mother would make Potato Croquettes for us. I eventually realized why it was only occasionally.

Without a standardized recipe the results were hit and miss. Sometimes the croquettes would fall apart and other times they would be rather dry and dense. This was another one of those elusive recipes, the kind that somehow avoided any formal documentation or exact measurement of ingredients.

I admit they are a little time consuming to make but well worth the extra effort.

I’ve never felt at ease making something for which no specific measurements are given. One has to be somewhat adventurous and also resigned to the fact that the probability of unsatisfactory results is high.

One happy day I came across this wonderful little recipe hidden away on the pages of an obscure magazine.

Anxiously I clipped it out and placed it into my “Recipes to Try Out” file. In a very short time the recipe graduated to my “Tried and True” recipe collection.

With great joy I now pass this great little recipe to you, measurements and all!

Potato Croquettes


5 medium size potatoes (boiled and mashed)
2 egg yolks
salt and pepper to taste
1 whole egg (beaten, for dipping)
bread crumbs
oil (for frying)
16 thin strips mozzarella (optional)
  1. Add salt and pepper to mashed potatoes.
  2. Beat in egg yolks with electric mixer.
  3. Spread mixture on floured baking sheet (approximately ¾ inch thick.)
  4. Cool completely.
  5. Cut into 16 equal portions. (If using mozzarella, place a strip lengthwise on each portion)
  6. Totally cover mozzarella strip with potato mixture and roll with hands into a log shape.
  7. Dip into beaten egg then roll in seasoned bread crumbs.
  8. Place on a tray and allow to rest in refrigerator at least 1 hour to set.
  9. Fry until golden, drain on paper towels.
Notes, Tips and Suggestions
  • If using mozzarella, cut the strips shorter than the potato sections so that you can totally encase it otherwise it will leak out when you fry the croquettes.
  • I used my favourite Yukon Gold potatoes in this recipe but any starchy, dry variety of potato works well.
  • It’s not necessary to season the beaten egg for dipping the croquettes into but lightly season the bread crumbs and a little chopped fresh parsley adds some colour and flavour.
  • These can be made earlier in the day, refrigerated and fried just before serving as they are best served warm.
  • Make sure oil is hot before frying and don’t leave unattended as these fry up rather quickly, keep turning them until all sides are golden.
  • Use a metal scraper or spatula to lift potato portions off baking sheet as they will be stuck to the floured pan.


Good Kitchen Help is Not Hard to Find


Instead of mashing potatoes I find that putting them through a potato ricer gives a lump free smoother texture to whatever you're making. (Okay I admit, it’s also a lot of fun to use.)

The scraper is a great tool especially when working with dough. In the Potato Croquette recipe it does a great job lifting the potato portions in one piece from the floured baking sheet.


Tuesday, August 11, 2009

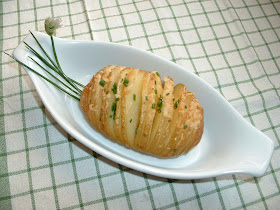
Baked Potato Fans


Potatoes, what amazing vegetables! You can dress them up, dress them down, fry, bake, boil, roast, mash, rice and steam them and these are only a few ways of preparation.

They've been incorporated into breads, cakes, pancakes, salads, soups and more yet we never seem to tire of them.

And if that’s not enough they also provide an essential ingredient in our recipe for Penne a la Vodka .

There are so many varieties to choose from and depending on what we are preparing there is a potato that’s the right colour, has the right texture and desired starch content for the recipe we choose.

As a young child, I just loved French fries. As a special Saturday night treat, my father would occasionally prepare some fries for my mother and the four of us kids.

He seemed to cut them just the right shape but the real treat was the paper cones he would make to hold the French Fries.

We would each get our own cone and with great enjoyment eat them with our fingers. When we were done eating he would get down on all fours and give each one of us a little pony ride around the kitchen and through the living and dining rooms. Even my mother would get a turn! How’s that for Saturday night entertainment?

To this day, when I eat French fries (with a fork of course) I get the irresistible urge to use my fingers.

Ah, the power of food memories!

In the next few weeks I will share some delicious potato recipes enjoyed by our family. Hopefully, these recipes will make more wonderful food memories!


Baked Potato Fans

4 medium size Yukon Gold potatoes (unpeeled, use potatoes with good skins)
¼ cup melted butter
salt and pepper to taste
2 tablespoons chopped fresh parsley or chives
¼ cup grated cheddar, provolone or any favourite cheese
  1. Scrub potatoes and place lengthwise between 2 wooden dowels or 2 wooden spoon handles to prevent knife from cutting all the way through and cut into thin slices.
  2. Put potatoes into a baking dish and drizzle with butter and season with salt and pepper.
  3. Cover baking dish with foil wrap and bake in a 425 degree F. oven for 45 to 50 minutes.
  4. Remove from oven and sprinkle with cheese.
  5. Bake 10 to 15 minutes longer (uncovered) or until lightly browned and cheese melts.
  6. Sprinkle with fresh herbs.
Notes, Tips and Suggestions
  • Although Yukon Gold potatoes are great for this recipe any good baking potato works well.
  • If the potatoes have blemishes or very tough skins it’s better to peel them.
  • Infuse your favourite herb flavour into the potatoes by adding sprigs of herbs to the roasting pan before baking.
  • Thyme or rosemary adds wonderful flavour.


Unearthing Some Interesting Potato Facts


Being such a versatile vegetable I would venture to say that most everyone likes at least one potato dish.

When counting calories we may tend to limit our intake of potatoes. I recently came across some information in a food magazine that allowed me to have a greater respect for the potato.

I was surprised to find out that one medium size potato only has 110 calories, is naturally fat free, high in vitamin C and has more potassium than a banana. Now that should make us feel better about eating them.

However, it doesn’t mean we shouldn’t be careful about what we put on or into the potatoes which could become detrimental to a healthy diet.

Thursday, August 6, 2009

Grilled Vegetables


How many times have we been told to eat our veggies?

Besides hearing it continuously from our parents during our early childhood years, as adults we are still hearing it from our doctors, nutritionists and dietitians.

Most of us have a few fond memories of staring into a plate of cooked vegetables and wishing they would magically disappear that we might finally be excused from the table.

Or the countless desserts we forfeited just to be spared the agony of another mouthful of something worse than punishment itself.

I find that new recipes are always popping up on the preparation and presentation of vegetables.

There’s an array of taste preferences ranging from totally raw vegetable dishes to crunchy stir fry to steamed or boiled preparations just to mention a few. Some vegetables are camouflaged by being pureed or mixed into other ingredients. This technique works very well especially with children. The vegetables that some profess to dislike and even hate are devoured with no hesitation.

It would seem that preparation of the many varieties of vegetables has taken on an art form, the bonus being the great nutritional value and sheer pleasure of eating them.

Grilled vegetables are one of our favourites. The taste of the grill, crisp texture and simple dressing is truly enjoyable and a great side to any meat, fish or chicken dish.

Just as enjoyable is a grilled vegetable sandwich toasted in a pannini press.

Grilled Vegetables

You can almost put any variety of vegetable on the grill, these are only a few we have enjoyed. Use any of your favourite vegetables, the possibilities are endless. Then dress them with the light, tasty dressing recipe that follows.

Red, green, orange and yellow peppers
Mushrooms (Button, Oyster, Portobello)
Asparagus
Zucchini
Egg plant
Corn or vegetable oil to coat vegetables
Salt and pepper to taste

  1. Wash and dry off all vegetables. Cut peppers in quarters, any smaller and you will risk losing the pieces through the barbecue grate. ( If desired cut them into smaller pieces after grilling.)
  2. If using button mushrooms use the appropriate barbecue grilling pan to prevent any from jumping into the fire. The larger mushrooms can be placed directly on the grill.
  3. Diagonally slice zucchini into ¼ to ½ inch thickness making slices as long as possible.
  4. Peeling egg plant is optional then also cut into ¼ to ½ inch slices.
  5. Trim asparagus removing the tough woody lower end.
  6. Pour vegetable or corn oil into your hands and rub some onto each piece of vegetable. (this will help prevent vegetables from drying out on the grill, (a little oil goes a long way.)
  7. Grill on high heat until you get those lovely grill marks and vegetables are tender but still crisp, don’t overcook.
  8. Remove from grill, season to taste and while still warm pour dressing over them making sure they are all coated.
  9. These can be eaten right away or stored in the fridge for 4 to 5 days. The longer they absorb the dressing the tastier they will become.
Dressing for Grilled Vegetables
¾ cup olive oil
¼ cup red wine vinegar
1 teaspoon yellow mustard
1 teaspoon salt
¼ teaspoon sugar
  1. Place olive oil, red wine vinegar, yellow mustard, salt, pepper and sugar in a 500 ml. jar or bottle with a tight fitting lid and shake until very well combined. The mustard will help to emulsify the mixture so the finished product will thicken somewhat.
  2. Add to your grilled vegetables.
  3. Makes 8 ounces of dressing.
Notes Tips and Suggestions
  • This dressing also works well on any salad greens
  • For tasty crostini appetizers as in the recipe for Zucchini Crostini, after grilling and before dressing the vegetables chop them into approximately ½ inch pieces.
  • Mix all the vegetables together and add dressing.
  • Before serving, drain well and spoon onto the prepared crostini.

Meet the Press
I love my pannini press and use it regularly. Besides toasting bread for crostini and grilling sandwiches you can also use it to grill your vegetables if you don’t have a barbecue.

If you don’t own a press and are thinking about investing in one, preferably choose one with the cooking surface that looks like a grill and not one with a flat cooking surface. This will give you those grill marks that make the bread or vegetables so appealing.

Again, it’s all about eating with your eyes first!


Saturday, August 1, 2009

Simply Vanilla Ice Cream


Even though we’re living in the age of microwaves, fast food and the availability of many instant foods, nothing can rush the process that a vanilla bean endures before it reaches our kitchens and added to our favourite recipes.

Each time I need to purchase vanilla beans I hesitate because of the cost. But then I remind myself of the time, work and care that goes into the growing and processing of nature’s wonderful little gift to us. I was surprised to find out that vanilla is the second most expensive spice after saffron.

Though it is referred to as a bean it is actually the seed of a vine from the orchid family.
When all is said and done and keeping in mind that it must be hand pollinated, it may take between nine to ten months before this fragrant bean is ready to be sold on the market.

Even though Mexican vanilla is the most highly prized, I find the Madagascar Bourbon varieties of both vanilla extract and bean to be intensely fragrant and flavourful. They also seem to be more readily available in the bulk food and grocery stores as I have yet to come across any Mexican vanilla myself.

This Vanilla Ice Cream recipe uses one whole vanilla bean and only natural ingredients and I especially like the fact that no eggs are used in the preparation.

It does however require the use of an Ice Cream Machine but the resulting creamy texture and exquisite taste far outweighs the extra effort required in making it.


Simply Vanilla Ice Cream


2 cups half and half (10% cream)
1 cup whipping cream (35% cream)
¾ cup granulated sugar
1 vanilla bean
  1. Split vanilla bean in half and scrape out seeds.
  2. Add vanilla seeds and hull to remaining ingredients and place in a medium saucepan.
  3. Place over medium heat and stir occasionally until mixture reaches 170 degrees F.
  4. If you don’t have a thermometer heat mixture until you see a bubble hit the surface.
  5. Do not allow to boil, remove from heat and cool slightly.
  6. Place in an airtight container and refrigerate overnight.
  7. Remove vanilla bean hull and freeze mixture per manufacturer’s directions of your ice cream maker
  8. Place prepared ice cream in a covered container and freeze at least 1 hour before serving.
  9. Makes 1 quart of ice cream

Notes, Tips and Suggestions

  • Remember to place Ice Cream Machine canister in the freezer the night before or at least 15 hours before you want to use it.
  • Don’t throw the vanilla bean hull away, wash and dry it and add to ¾ cups granulated sugar and in a few days you will have vanilla sugar for your next batch of ice cream.
  • Remove ice cream from freezer a few minutes before serving to soften slightly.
  • This ice cream is especially good when served with homemade apple, peach or cherry pie.

Make a Good Investment…Yummy Dividends Will Follow

I don’t think owning an Ice Cream Machine ranks high on the kitchen utensil priority list but if you enjoy really good frozen treats the investment is truly worth while.

Some planning is required when using the machine as the canister must be placed in the freezer over night and the mixture must be made the day ahead and refrigerated overnight for best results.

The actual time it takes to make the ice cream or any other frozen dessert ranges between 20 to 30 minutes depending on what you’re making.

The ice cream Machine can be used year round so you’re not investing in something that can only be used during the summer months. Ice cream is yummy no matter what season.

I recently became aware that Kitchen Aid has Ice Cream Machine accessories available to attach onto their Kitchen Aid mixer. If you are considering purchasing an Ice cream Machine and own a Kitchen Aid mixer it would be a good idea to check out this option first.